Garage Door Weather Stripping: Types, Replacement, Costs & Complete Guide

A garage door may appear closed but will allow light, water, dust, pests and cold air to enter. The majority of these issues are caused by worn seals, improper installation, uneven concrete or a bottom seal that doesn’t meet the side seal.
Garage Door Weather Stripping is a complete sealing system. May contain a bottom seal, perimeter seal, threshold seal, inter-panel seal, brush seal and integrated vinyl doorstop. Each component addresses a different gap.
The correct solution to the problem is the right one. If daylight is a problem under the door, a worn bottom strip can help. If the water is coming in from a sloped driveway, a threshold seal may be of assistance. Perimeter or doorstop seals are typically required at side and top gaps. If water still enters after replacement, the problem may be with seal profile, door alignment, floor slope or corner contact.
Follow this garage door spring replacement guide to find out what the problem is, to match the right seal, to measure before purchasing and to solve common sealing issues without guesswork.
Quick Answer: What Is Garage Weather Stripping?
Garage Door Weather Stripping is the soft material that is used to seal gaps around a garage door. It can also be referred to as a garage door seal, weather seal, bottom gasket, astragal seal, perimeter seal or doorstop seal.
It is useful to prevent air, water, light, dust, insects and pests from entering. The correct seal is determined by the location of the gap—bottom, sides, top, threshold, or between panels.
Why Weather Stripping And Garage Door Seals Are Important
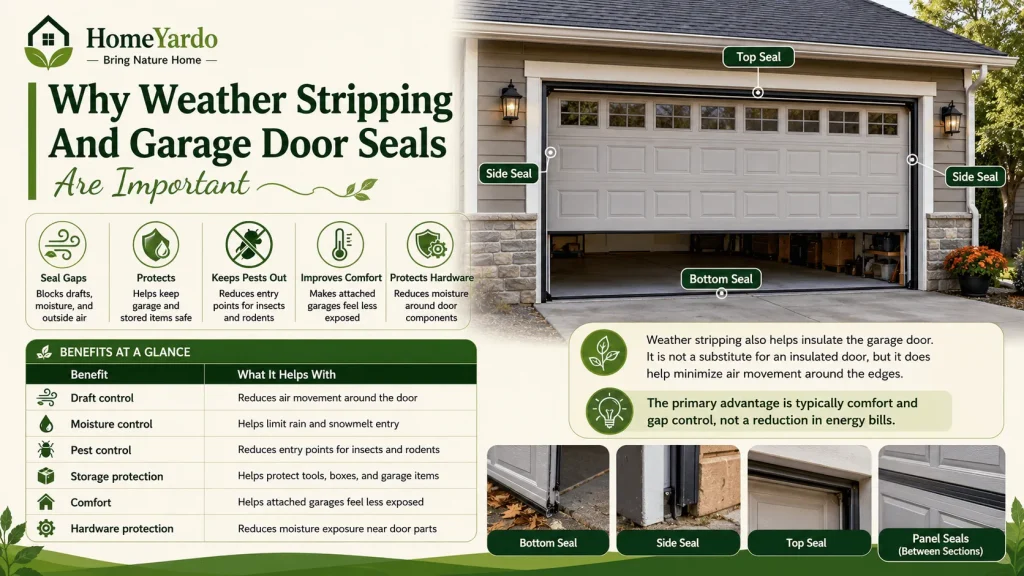
There are a number of gaps in the garage door. The bottom edge abuts the concrete, the side edges abut the frame, the top edge abuts the header, and sectional panels slide when the door is opened or closed. Weather stripping can seal these areas without interfering with the door’s movement.
Sealing can help minimize drafts, moisture, and storage issues, and make an attached garage more protected from the elements. It also helps to prevent small pests from entering through the gaps.
| Benefit | What It Helps With |
|---|---|
| Draft control | Reduces air movement around the door |
| Moisture control | Helps limit rain and snowmelt entry |
| Pest control | Reduces entry points for insects and rodents |
| Storage protection | Helps protect tools, boxes, and garage items |
| Comfort | Helps attached garages feel less exposed |
| Hardware protection | Reduces moisture exposure near door parts |
Weather stripping also helps insulate the garage door. It is not a substitute for an insulated door, but it does help minimize air movement around the edges. The primary advantage is typically comfort and gap control, not a reduction in energy bills.
Garage Door Seal Types And Their Placement
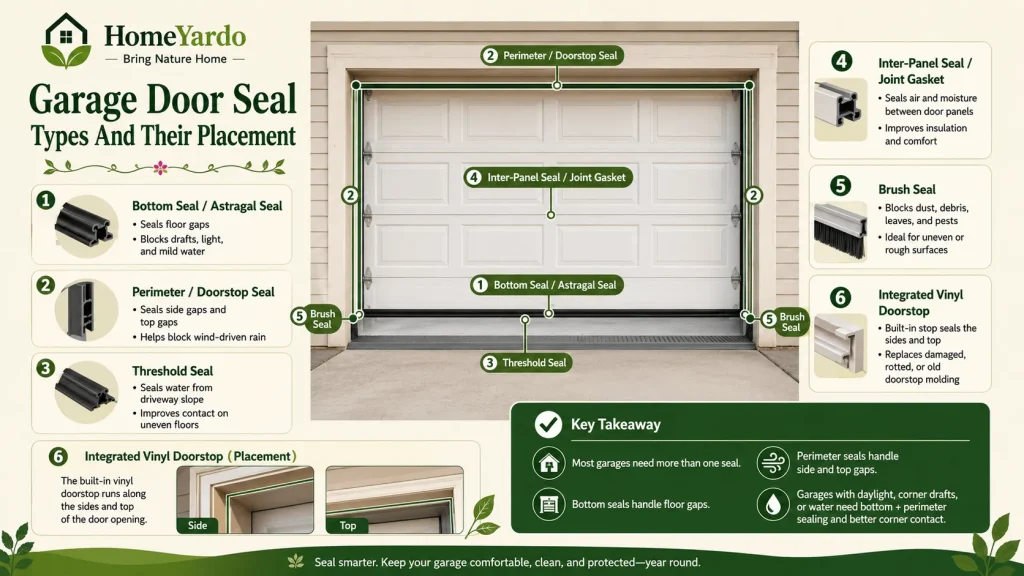
Garage Door Seals are most effective when used in their proper place. A bottom seal won’t seal a side gap and a threshold seal won’t seal a rotted doorstop.
| Seal Type | Placement | Best For |
|---|---|---|
| Bottom seal or astragal seal | Bottom edge of the door | Floor gaps, drafts, light, mild water |
| Perimeter or doorstop seal | Side and top frame | Side gaps, top gaps, wind-driven rain |
| Threshold seal | Garage floor | Water from the driveway slope or uneven floor contact |
| Inter-panel seal or joint gasket | Between door sections | Air and moisture between door panels |
| Brush seal | Bottom or frame area | Dust, debris, rough surfaces |
| Integrated vinyl doorstop | Side and top frame trim | Damaged, rotted, or old doorstop molding |
The majority of garages require more than one seal. Bottom seals are for gaps in the floor and perimeter seals are for gaps at the sides and top of the floor. Garages with daylight at the floor, side drafts and water at the corners will require bottom sealing, perimeter sealing and improved corner contact.
Garage Door Bottom Seal Or Astragal Seal
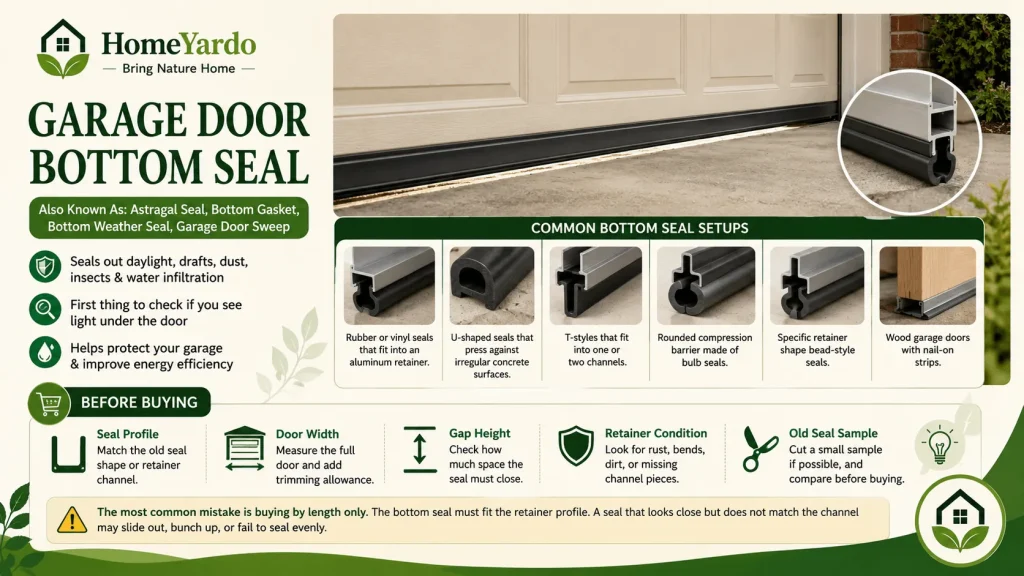
The strip at the bottom of the garage door is called the bottom seal. It is also known as an astragal seal, bottom gasket, bottom weather seal or garage door sweep.
When the garage door is closed, it pushes against the ground. A well-fitted bottom seal will decrease daylight, drafts, dust, insects and slight water infiltration. It is the first one that is checked when lights are seen under the door.
Common bottom seal setups include:
- Rubber or vinyl seals that fit into an aluminum retainer.
- U-shaped seals that press against irregular concrete surfaces
- T-styles that fit into one or two channels
- Rounded compression barrier made of bulb seals
- Specific retainer shape bead-style seals
- Wood garage doors with nail-on strips.
If the floor has a wider gap between the cracked, settled, or uneven concrete, a U-shaped gasket can be used. The seal should fit the retainer channel better and should be either a T-style or bead style.
| Before Buying | What To Check |
|---|---|
| Seal profile | Match the old seal shape or retainer channel |
| Door width | Measure the full door and add trimming allowance |
| Gap height | Check how much space the seal must close |
| Retainer condition | Look for rust, bends, dirt, or missing channel pieces |
| Old seal sample | Cut a small sample if possible, and compare before buying |
The most common mistake is buying by length only. The bottom seal must fit the retainer profile. A seal that looks close but does not match the channel may slide out, bunch up, or fail to seal evenly.
Perimeter Or Garage Door Top Seal
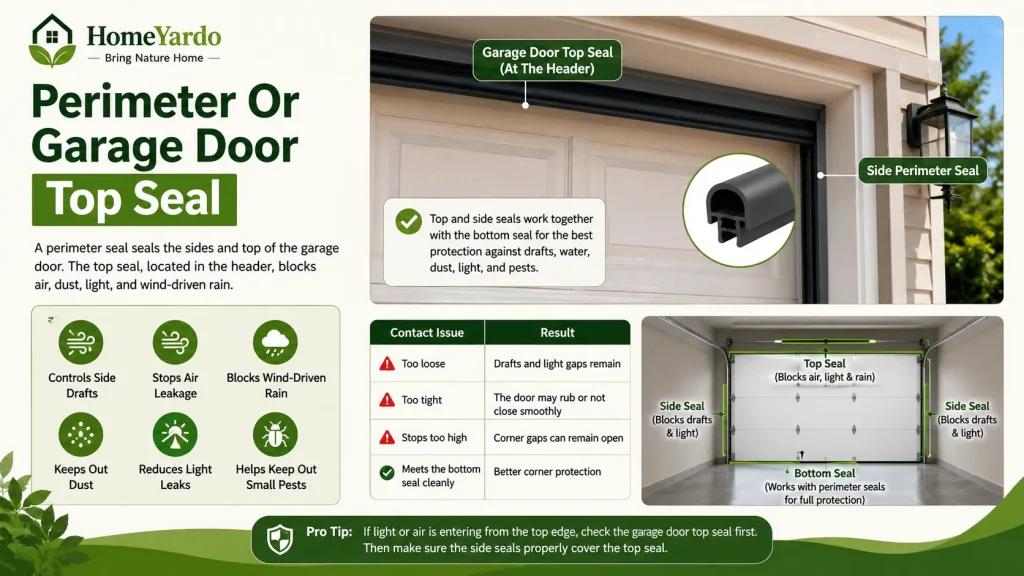
A perimeter seal seals the sides and top of the garage door. The upper portion of this system is the garage door top seal. It is located in the header space and prevents air, dust, light and wind-driven rain from penetrating the closed door.
The top seal is typically used in conjunction with the side perimeter seals. Even when the top edge is closed and the side edges are loose, water and drafts can still work their way in around the frame. The flexible edge should lightly press against the closed door with a slight bend.
Perimeter and top seals are used to control side drafts, top edge air leakage, light at vertical edges, wind-driven rain near the frame, dust entry, and entry by small pests.
| Contact Issue | Result |
|---|---|
| Too loose | Drafts and light gaps remain |
| Too tight | The door may rub or not close smoothly |
| Stops too high | Corner gaps can remain open |
| Meets the bottom seal cleanly | Better corner protection |
A good perimeter seal is used in conjunction with the bottom seal. When the side seals are installed too high above the floor, gaps in the corners can also be left open even after a new bottom seal is installed. If light or air is entering from the top edge, first check the garage door top seal and then determine if the side seals are covering the top seal properly.
Integrated Vinyl Doorstop With Weatherstrip
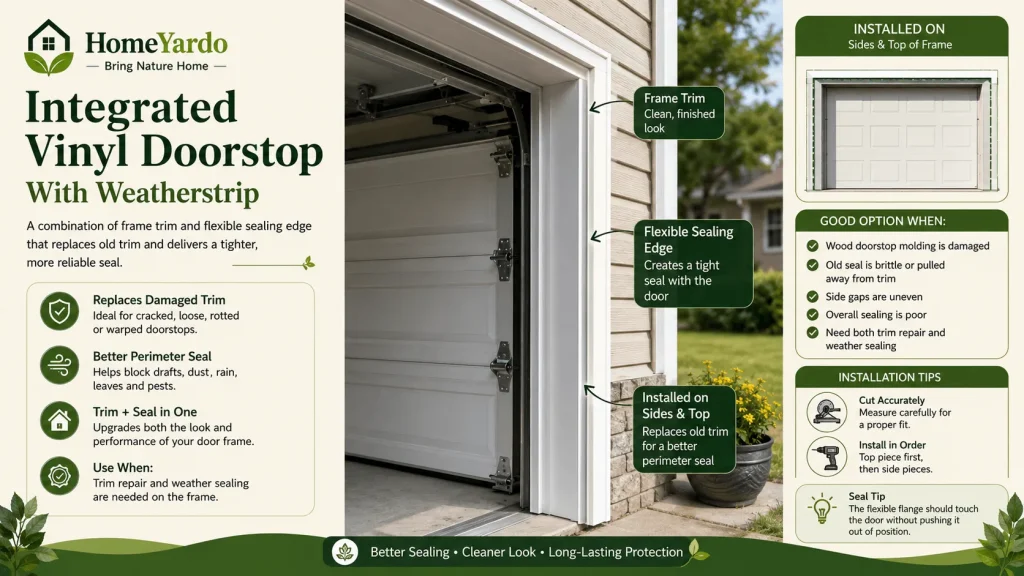
An integrated vinyl doorstop is a combination of frame trim and flexible sealing edge. It can be helpful if the old doorstop is cracked, loose, rotted, warped or no longer sealing well.
This is typically mounted on the sides and top of the garage door frame. It’s used to replace old trim and provide a better perimeter seal. It’s more of a trim replacement upgrade than a strip replacement.
It is a good option when:
- Wood doorstop molding is damaged
- The old seal is brittle or has been removed from the trim.
- Side gaps are not even
- The superior sealing is poor.
- Both trim repair and weather sealing are required on the frame.
Cutting and fastening need to be accurate. The top piece is generally inserted first, followed by the side pieces. The flexible flange should be in contact with the door without pushing it out of position.
Threshold Seal
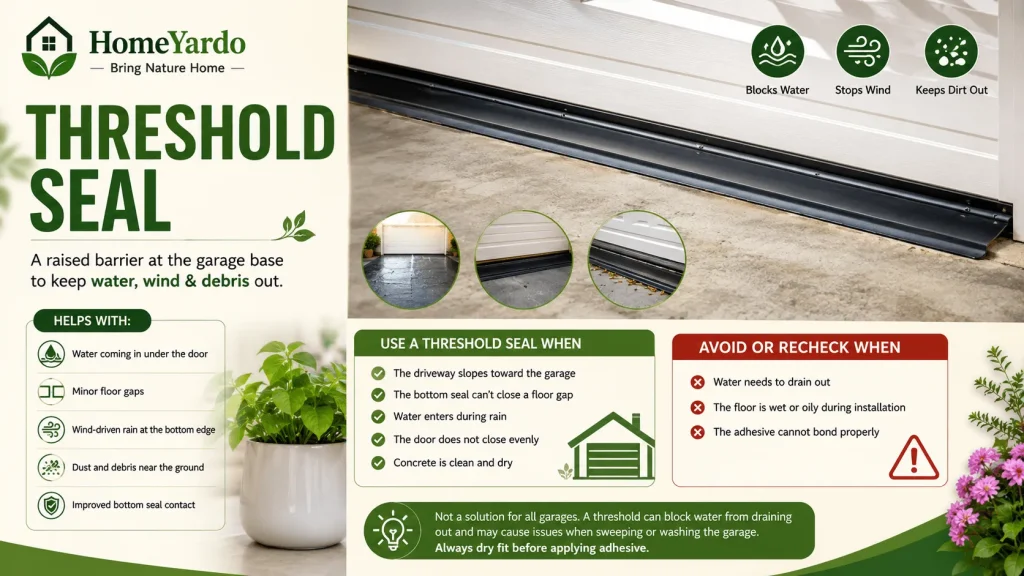
A threshold seal attaches to the bottom of the garage, rather than to the door. It provides a raised barrier at the base seal to the concrete.
This is a great seal to use if water is flowing towards the garage, particularly if the driveway slopes inwards. It can also be used when the bottom seal is not hitting the floor evenly. In some cases, a threshold seal can be used alone, but it will work best with a good bottom seal.
A threshold seal can help with:
- Water is coming in under the door
- Minor floor gaps
- Rain driven by wind at the bottom edge
- A dust and debris motion in the vicinity of the ground.
- Enhanced bottom seal contact
| Use A Threshold Seal When | Avoid Or Recheck When |
|---|---|
| The driveway slopes toward the garage | Water needs to drain out |
| The bottom seal cannot close a floor gap | The floor is wet or oily during installation |
| Water enters during rain | The door does not close evenly |
| Concrete is clean and dry | The adhesive cannot bond properly |
It’s not a solution for all garages. A garage threshold can block water from draining out of the garage. It can also cause problems when sweeping or washing out the garage. Dry fit the threshold prior to application of the adhesive.
Inter-panel Seal Or Joint Gaskets
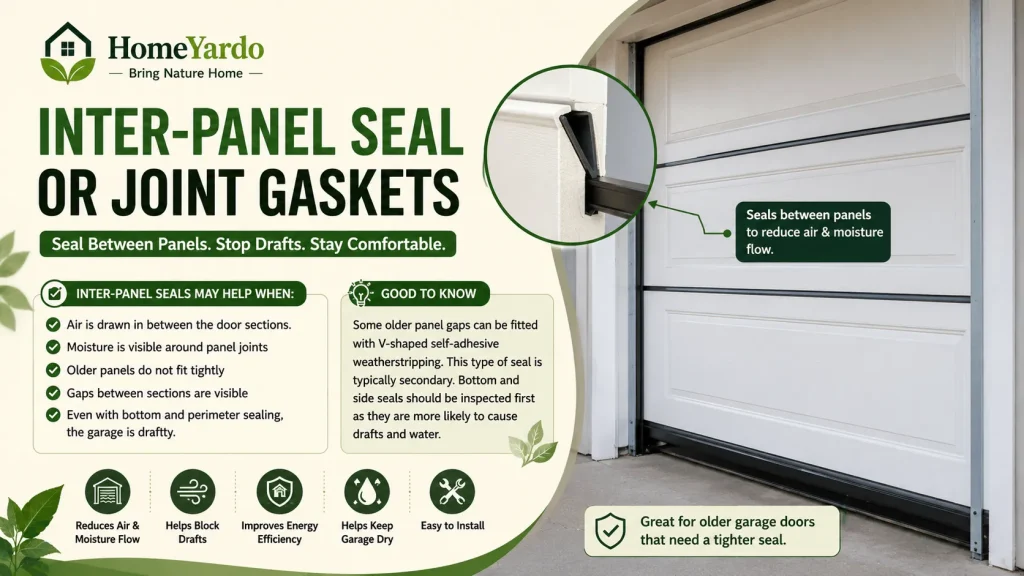
Joint gaskets, also known as inter-panel seals, are placed between the panels of a garage door. They help to minimize air and moisture flow through the joints of sectional doors.
They are best used on older doors, particularly older flat panel wood doors. Many newer steel, aluminum or fiberglass type doors already come with shaped edges of the panels to minimize air movement.
Inter-panel seals may help when:
- Air is drawn in between the door sections.
- Moisture is visible around panel joints
- Older panels do not fit tightly
- There are gaps between sections in the door visible
- Even with bottom and perimeter sealing, the garage is drafty.
Some older panel gaps can be fitted with V-shaped self-adhesive weatherstripping. This type of seal is typically secondary. Seals on the bottom and sides should be inspected first as they are more likely to cause drafts and water.
Brush Seal
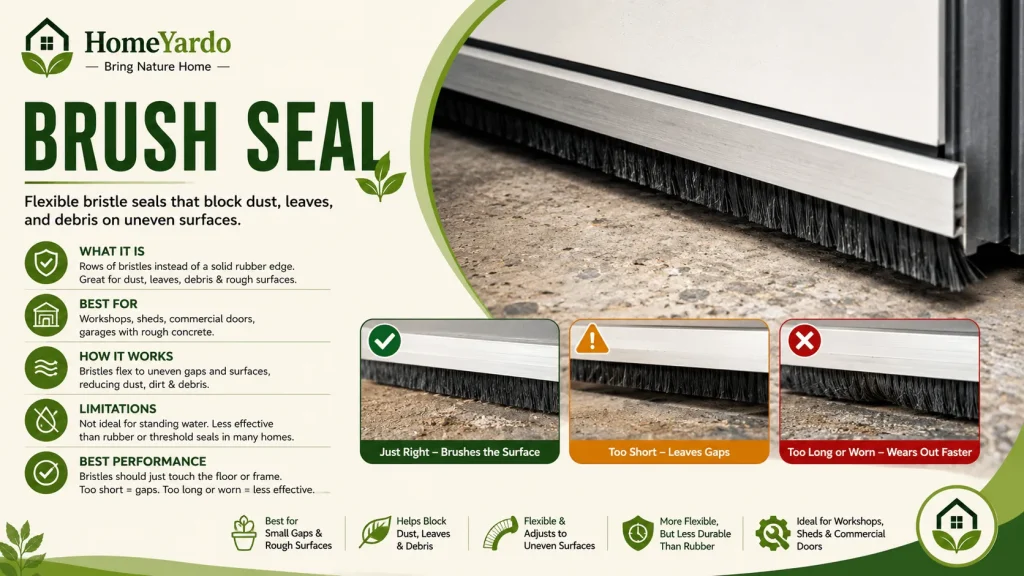
Brush seals are made of rows of bristles rather than a solid rubber edge. These are good for dust, leaves, debris and rough surfaces where a solid seal will not lie flat.
Brush seals are commonly installed on workshops, sheds, commercial doors or garages with rough concrete. Are more flexible than some rigid seals with irregular gaps.
They are not the best choice for standing water. Bristles will reduce the speed of debris and dust, but are not as effective as a rubber bottom seal or threshold seal. In many residential situations, they can also be less durable than solid rubber.
Brush seals are best suited when the bristles just brush against the floor or frame. When they are too short they leave gaps. When they’re broken too severely, they wear out faster.
Garage Door Seal Materials Compared
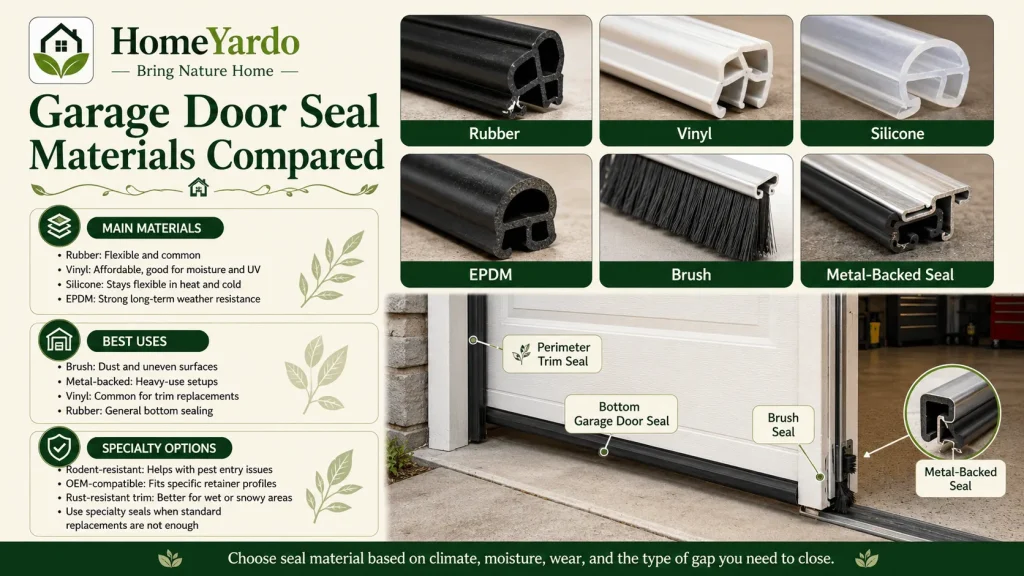
The material will impact flexibility, durability, water resistance and cold weather performance. The choice of material will depend on the climate, floor condition, use of the garage and location of the seal.
| Material | Best For | Notes |
|---|---|---|
| Rubber | General bottom sealing | Flexible and common |
| Vinyl | Moisture and UV exposure | Affordable and common |
| Silicone | Heat or cold flexibility | Higher-cost option |
| EPDM | Durable weather resistance | Often used in stronger bottom seals |
| Brush | Dust and uneven surfaces | Not fully watertight |
| Metal-backed seal | Heavy use | Better for commercial or high-wear setups |
Rubber is a common choice for bottom seals because it compresses well. Vinyl is common for perimeter and replacement trim. Silicone can stay flexible in temperature swings. EPDM is often used where long-term weather resistance matters.
| Specialty Seal Notes | Best Use |
|---|---|
| EPDM seal | Durable weather resistance and cold-weather flexibility |
| Rodent-resistant seal | Repeated pest chewing or pest entry |
| Metal-backed seal | Heavy-use or commercial-style doors |
| OEM-compatible seal | Doors with specific retainer profiles |
| Rust-resistant metal trim | Wet, snowy, or high-moisture areas |
Garage door seals for commercial purposes can be bulb seals, metal-backed, brush seals, or sensing-edge-compatible. These are typically best managed by the door manufacturer, installer or door distributor, as fit and safety requirements may vary from the standard residential door.
Specialty seals can be used when a simple rubber or vinyl replacement seal cannot solve the issue. Always use specialty seals that correspond to the garage door model, retainer and gap type.
How To Choose The Right Garage Door Seal
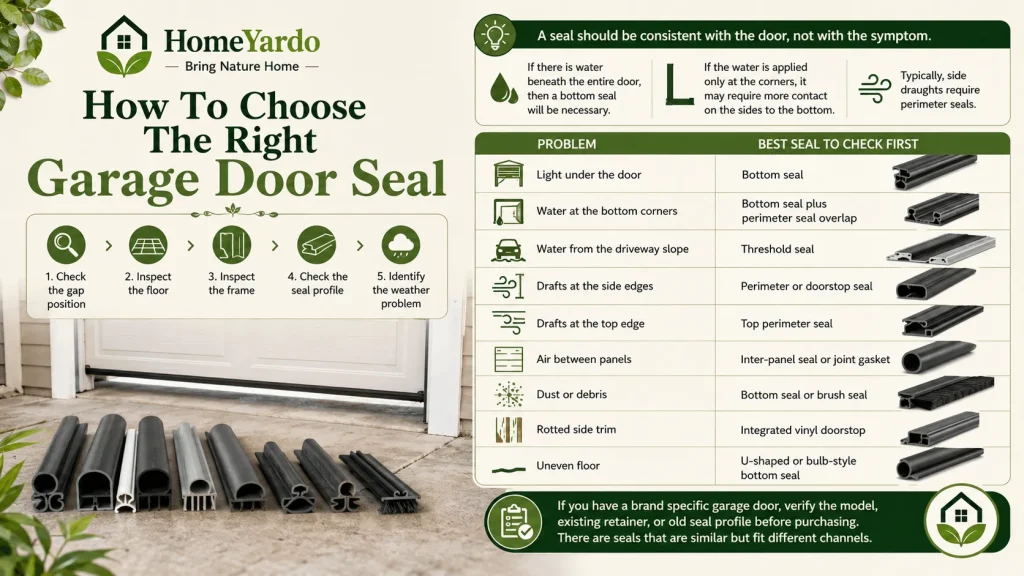
Begin at the gap position. Next, inspect the floor, frame, seal profile and weather problem.
A seal should be consistent with the door, not with the symptom. If there is water beneath the entire door, then a seal on the bottom will be necessary. If the water is applied only at the corners, it may require more contact on the sides to the bottom. Typically, side draughts require perimeter seals.
| Problem | Best Seal To Check First |
|---|---|
| Light under the door | Bottom seal |
| Water at the bottom corners | Bottom seal plus perimeter seal overlap |
| Water from the driveway slope | Threshold seal |
| Drafts at the side edges | Perimeter or doorstop seal |
| Drafts at the top edge | Top perimeter seal |
| Air between panels | Inter-panel seal or joint gasket |
| Dust or debris | Bottom seal or brush seal |
| Rotted side trim | Integrated vinyl doorstop |
| Uneven floor | U-shaped or bulb-style bottom seal |
If you have a brand specific garage door, verify the model, existing retainer, or old seal profile before purchasing. There are seals that are similar but fit different channels.
Before Buying A Garage Door Seal
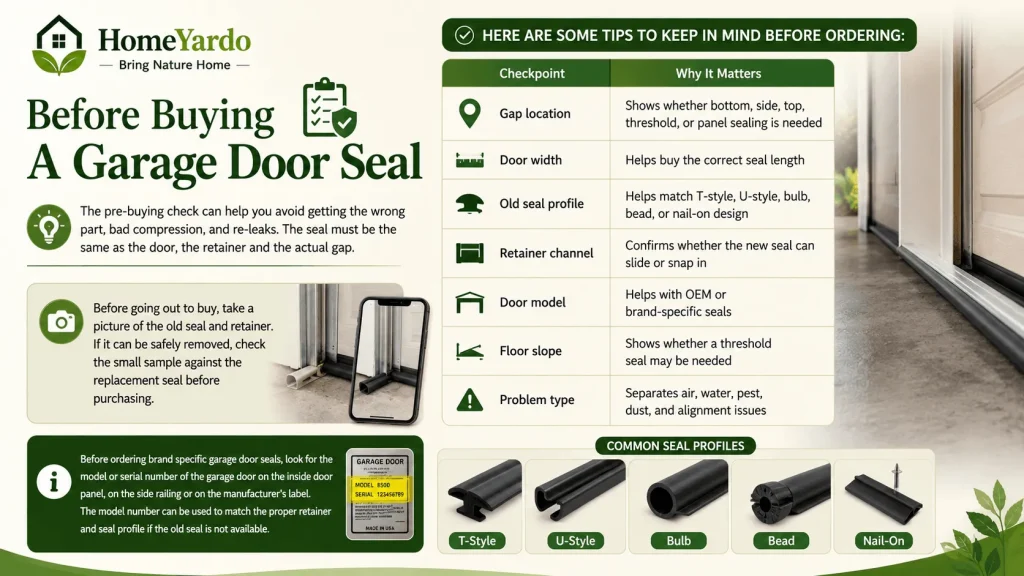
The pre-buying check can help you avoid getting the wrong part, bad compression, and re-leaks. The seal must be the same as the door, the retainer and the actual gap.
Here are some tips to keep in mind before ordering:
| Checkpoint | Why It Matters |
|---|---|
| Gap location | Shows whether bottom, side, top, threshold, or panel sealing is needed |
| Door width | Helps buy the correct seal length |
| Old seal profile | Helps match T-style, U-style, bulb, bead, or nail-on design |
| Retainer channel | Confirms whether the new seal can slide or snap in |
| Door model | Helps with OEM or brand-specific seals |
| Floor slope | Shows whether a threshold seal may be needed |
| Problem type | Separates air, water, pest, dust, and alignment issues |
Before going out to buy, take a picture of the old seal and retainer. If it can be safely removed, check the small sample against the replacement seal before purchasing.
Before ordering brand specific garage door seals, look for the model or serial number of the garage door on the inside door panel, on the side railing or on the manufacturer’s label. The model number can be used to match the proper retainer and seal profile if the old seal is not available.
Bottom Seal Profiles And Retainer Compatibility
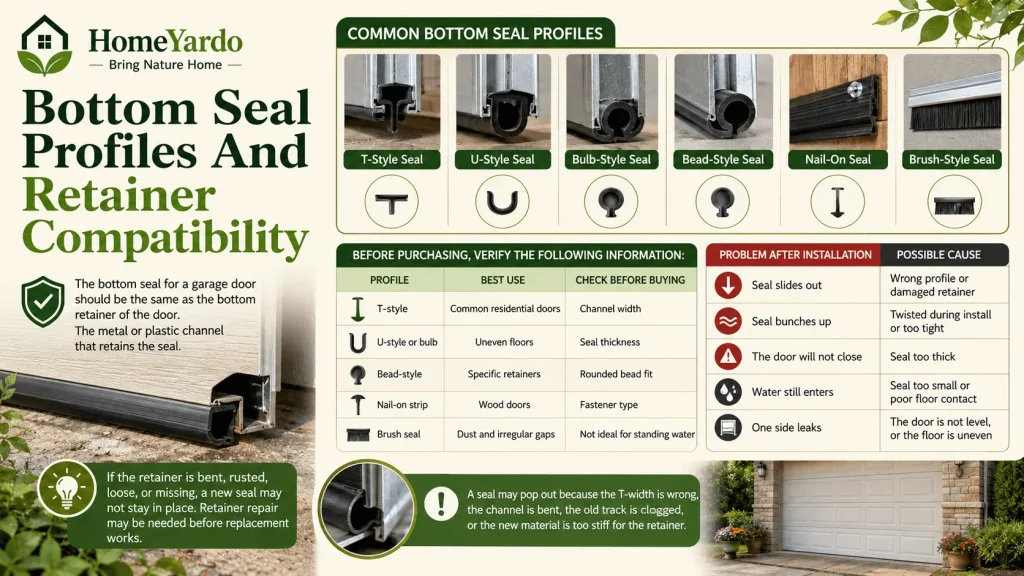
The bottom seal for a garage door should be the same as the bottom retainer of the door. The metal or plastic channel that retains the seal.
Common profiles include:
- T-style seal
- U-style seal
- Bulb-style seal
- Bead-style seal
- Nail-on seal
- Brush-style bottom seal
A T-shaped seal is one that slides into channels. A U-shaped or bulb-shaped seal forms a soft pocket that presses against the ground. A bead-style seal is a seal that fits into a round channel. Some wood doors are more likely to have nail-on seals.
Before purchasing, verify the following information:
| Profile | Best Use | Check Before Buying |
|---|---|---|
| T-style | Common residential doors | Channel width |
| U-style or bulb | Uneven floors | Seal thickness |
| Bead-style | Specific retainers | Rounded bead fit |
| Nail-on strip | Wood doors | Fastener type |
| Brush seal | Dust and irregular gaps | Not ideal for standing water |
If the retainer is bent, rusted, loose, or missing, a new seal may not stay in place. Retainer repair may be needed before replacement works.
| Problem After Installation | Possible Cause |
|---|---|
| Seal slides out | Wrong profile or damaged retainer |
| Seal bunches up | Twisted during install or too tight |
| The door will not close | Seal too thick |
| Water still enters | Seal too small or poor floor contact |
| One side leaks | The door is not level, or the floor is uneven |
A seal may pop out because the T-width is wrong, the channel is bent, the old track is clogged, or the new material is too stiff for the retainer.
Signs: It’s Time To Replace Your Seals
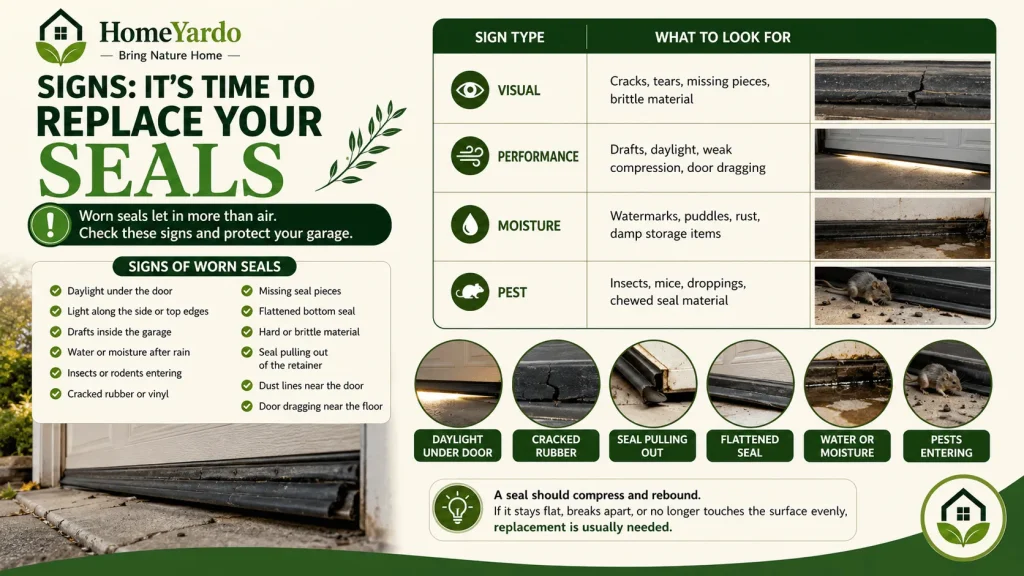
Garage door seals wear down from the sun, cold, water, dirt, road salt, and repeated compression. Visual checks can show when replacement is needed.
| Sign Type | What To Look For |
|---|---|
| Visual | Cracks, tears, missing pieces, brittle material |
| Performance | Drafts, daylight, weak compression, door dragging |
| Moisture | Watermarks, puddles, rust, damp storage items |
| Pest | Insects, mice, droppings, chewed seal material |
Signs of worn seals include:
- Daylight under the door
- Light along the side or top edges
- Drafts inside the garage
- Water or moisture after rain
- Insects or rodents entering
- Cracked rubber or vinyl
- Missing seal pieces
- Flattened bottom seal
- Hard or brittle material
- Seal pulling out of the retainer
- Dust lines near the door
- Door dragging near the floor
A seal should compress and rebound. If it stays flat, breaks apart, or no longer touches the surface evenly, replacement is usually needed.
How Much Does Garage Door Weather Stripping Cost?
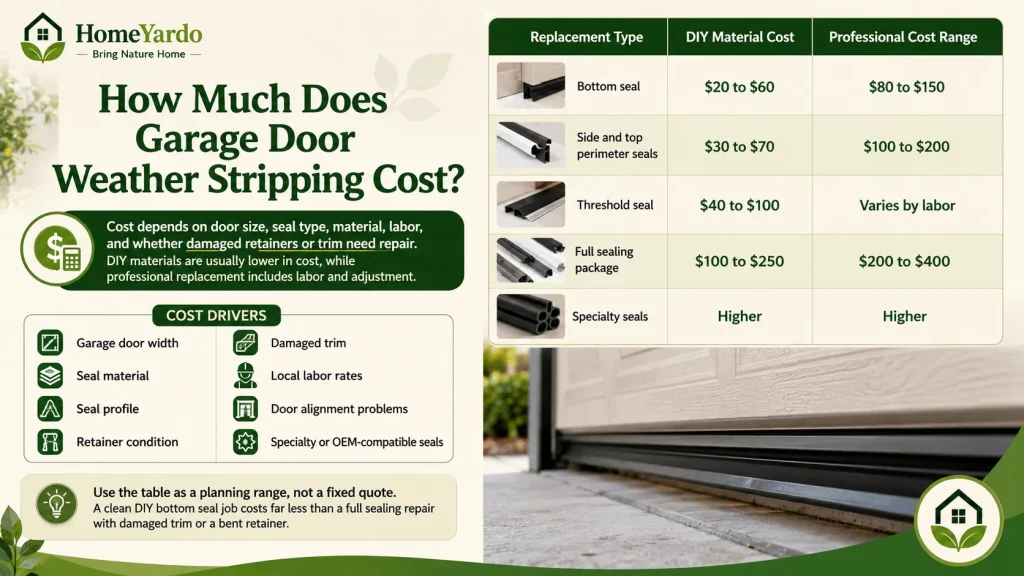
Cost depends on door size, seal type, material, labor, and whether damaged retainers or trim need repair. DIY materials are usually lower in cost, while professional replacement includes labor and adjustment.
| Replacement Type | DIY Material Cost | Professional Cost Range |
|---|---|---|
| Bottom seal | $20 to $60 | $80 to $150 |
| Side and top perimeter seals | $30 to $70 | $100 to $200 |
| Threshold seal | $40 to $100 | Varies by labor |
| Full sealing package | $100 to $250 | $200 to $400 |
| Specialty seals | Higher | Higher |
A simple bottom seal replacement may be affordable. A full sealing job costs more if it includes bottom, perimeter, threshold, and specialty seals. Bent retainers, rotted trim, or door alignment problems can raise the total cost.
Cost drivers include:
- Garage door width
- Seal material
- Seal profile
- Retainer condition
- Damaged trim
- Local labor rates
- Door alignment problems
- Specialty or OEM-compatible seals
Use the table as a planning range, not a fixed quote. A clean DIY bottom seal job costs far less than a full sealing repair with damaged trim or a bent retainer.
How To Measure For Garage Door Weather Stripping
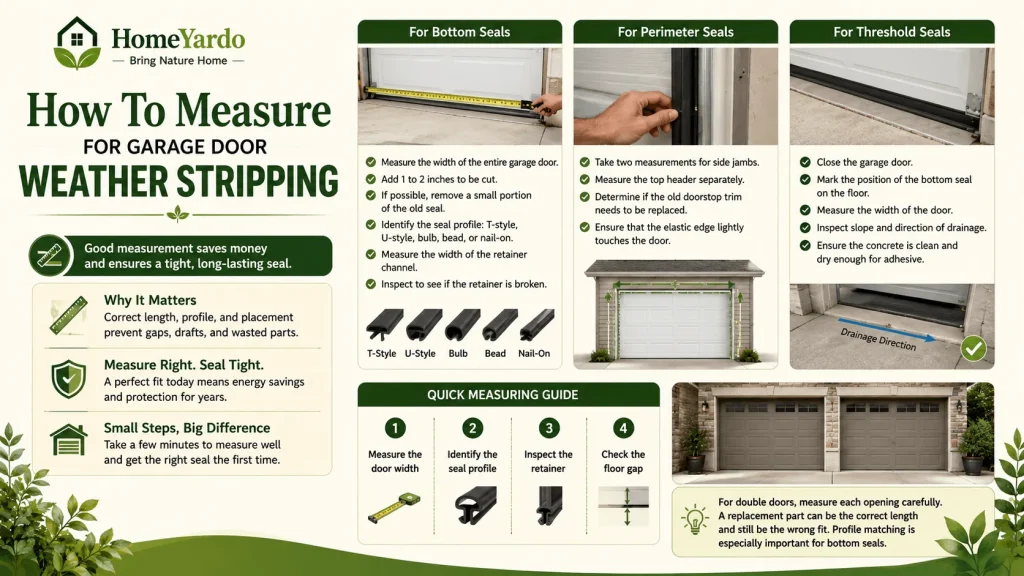
Wasted parts and poor sealing are avoided due to good measurement. The length is important but the profile and placement are more important.
For bottom seals:
- Measure the width of the entire garage door.
- Add 1 to 2 inches to be cut.
- If possible, take off a small portion of the old seal.
- Look for the seal to see if it is T-style, U-style, bulb, bead or nail-on.
- Measure the width of the retainer channel.
- Inspect to see if the retainer is broken.
For perimeter seals:
- Take two measurements for side jambs.
- Measure the top header separately.
- Determine if the old doorstop trim needs to be replaced.
- Ensure that the elastic edge lightly touches the door.
For threshold seals:
- Close the garage door.
- Indicate on the ground the position of the bottom seal.
- Take a measurement of the width of the door.
- Inspect slope and direction of drainage.
- Ensure that the concrete is clean enough to apply adhesive.
Use this quick measuring guide before buying:
| Step | What To Do |
|---|---|
| 1 | Measure the door width |
| 2 | Identify the seal profile |
| 3 | Inspect the retainer |
| 4 | Check the floor gap |
For double doors, measure each opening carefully. A replacement part can be the correct length and still be the wrong fit. Profile matching is especially important for bottom seals.
Tools And Materials Needed
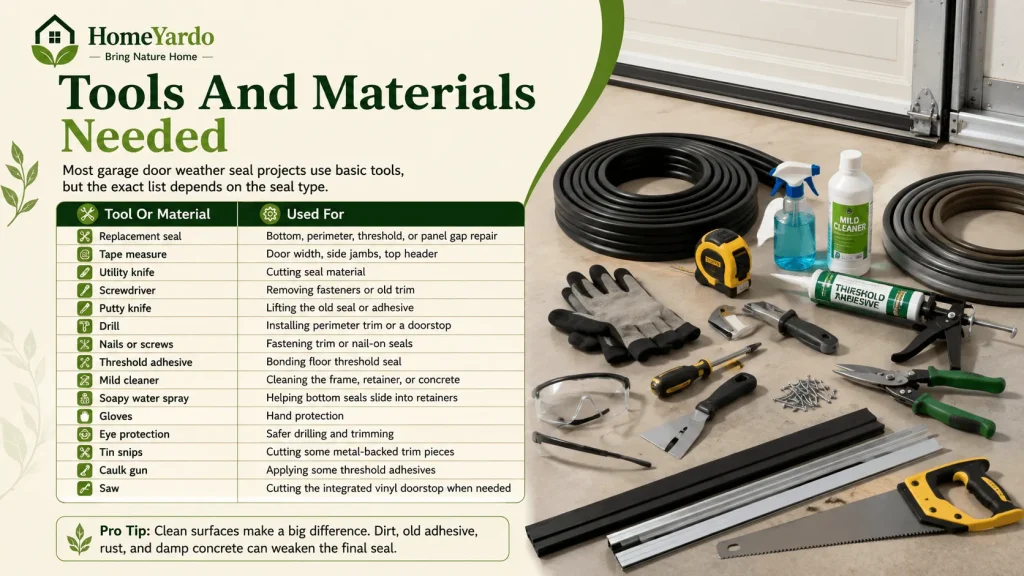
Most garage door weather seal projects use basic tools, but the exact list depends on the seal type.
| Tool Or Material | Used For |
|---|---|
| Replacement seal | Bottom, perimeter, threshold, or panel gap repair |
| Tape measure | Door width, side jambs, top header |
| Utility knife | Cutting seal material |
| Screwdriver | Removing fasteners or old trim |
| Putty knife | Lifting the old seal or adhesive |
| Drill | Installing perimeter trim or a doorstop |
| Nails or screws | Fastening trim or nail-on seals |
| Threshold adhesive | Bonding floor threshold seal |
| Mild cleaner | Cleaning the frame, retainer, or concrete |
| Soapy water spray | Helping bottom seals slide into retainers |
| Gloves | Hand protection |
| Eye protection | Safer drilling and trimming |
| Tin snips | Cutting some metal-backed trim pieces |
| Caulk gun | Applying some threshold adhesives |
| Saw | Cutting the integrated vinyl doorstop when needed |
Clean surfaces make a big difference. Dirt, old adhesive, rust, and damp concrete can weaken the final seal.
Replacement And Installation Basics
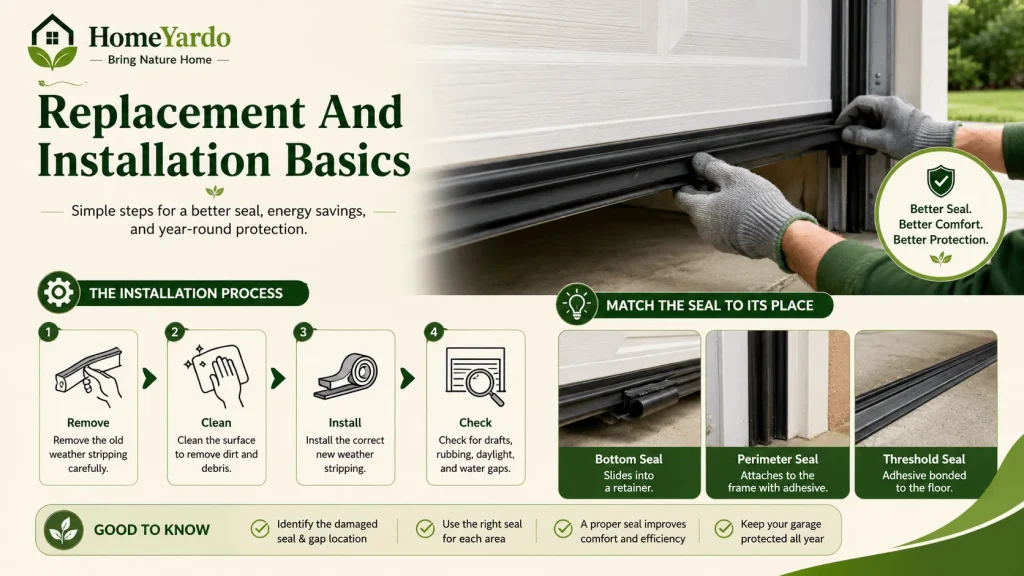
Garage door weather stripping replacement can only begin once the damaged seal, retainer style and the location of the gap have been determined. The bottom seal, perimeter seal, threshold seal and inter-panel seal are not all installed the same way, so it is important to know where the gap is to ensure you get the right seal.
The typical garage door weather stripping installation process involves removing the old weather stripping, cleaning the area where it was in place, installing the right new weather stripping, and checking the door for daylight, drafts, rubbing and water gaps when it is closed.
When learning how to install weather stripping on garage door edges, first determine how to match the seal to its place. Usually, the bottom seals slide into a retainer, perimeter seals attach to the frame with adhesive and the threshold seal is adhesive bonded to the floor of the garage.
How To Install Garage Door Bottom Weather Stripping
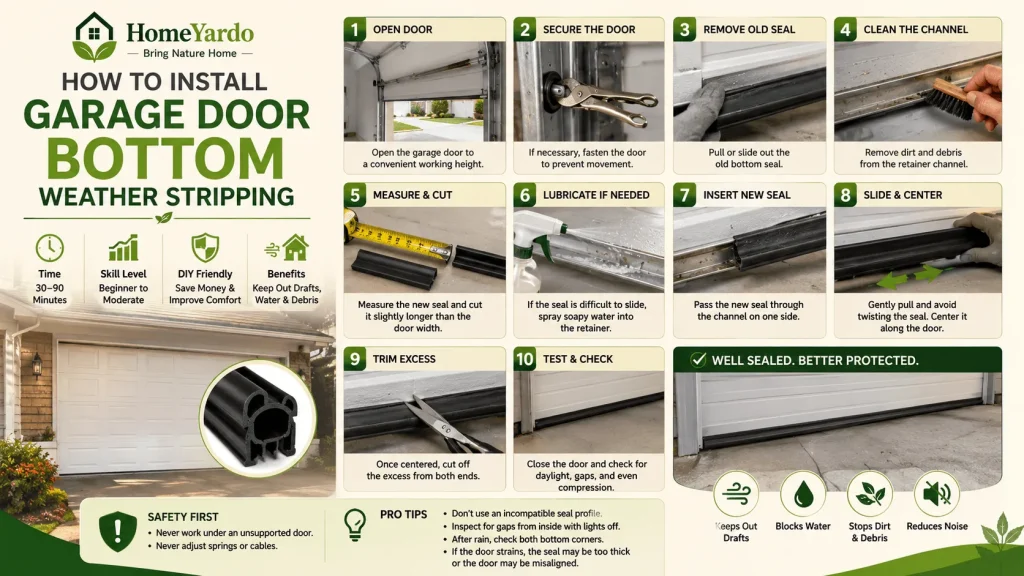
One of the most popular DIY garage door sealing tasks is to replace the bottom seal. The time for a simple replacement is approximately 30 to 90 minutes depending on the condition of the seal, the condition of the retainer and the width of the door.
When the old seal slides out and the retainer remains intact, the skill level is beginner to moderate. Never work under an unsupported door and never adjust springs or cables.
Have the replacement seal on hand before removing the old seal. If the seal was providing cushion or height, the door may close harder on the floor without the bottom seal installed.
- Open the garage door to a convenient working height.
- If necessary, fasten the door to prevent it from moving during the work.
- Pull or slide out the old bottom seal.
- Remove dirt and debris from the retainer channel.
- Take the new seal’s measurement and cut it slightly longer than the door width.
- If the seal is difficult to slide, spray soapy water into the retainer.
- Pass the new seal through the channel on one side.
- Gently pull and avoid twisting the seal.
- Once the seal is centered, cut off the ends.
- Close the door and see if there is daylight, gaps, and even compression.
If the seal does not slide, the retainer could be bent or clogged. Never insert a profile that is incompatible with the channel. This can cause damage to the seal and still leave gaps.
Once installed, turn the garage lights off during the day and inspect for gaps from the inside. After the first rainfall, check both bottom corners. If it strains, it may be too thick for the opener, or the door may be misaligned.
How To Replace Perimeter Or Doorstop Weatherstripping
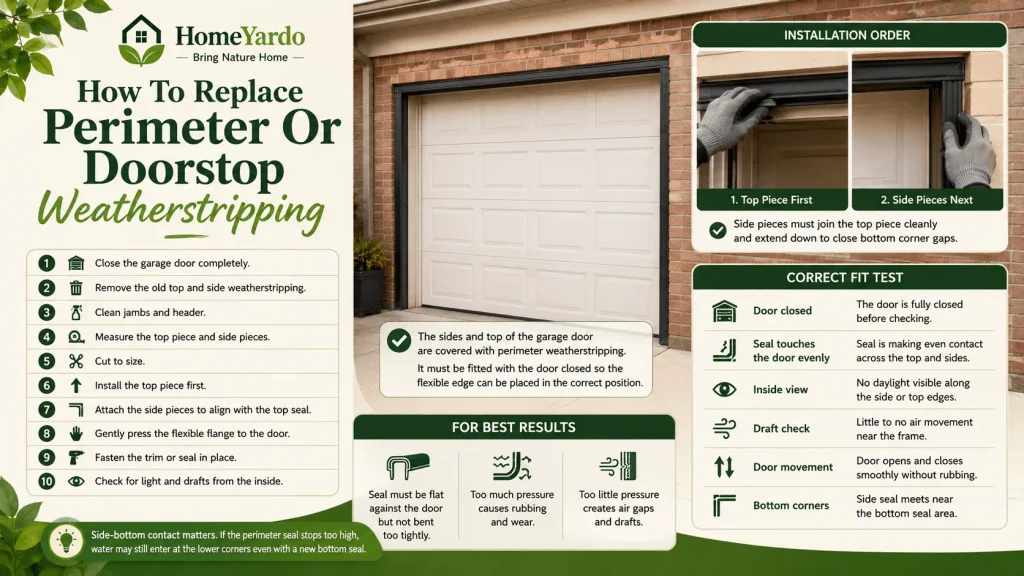
The sides and top of the garage door are covered with perimeter weatherstripping. It must be fitted with the door closed so the flexible edge can be placed in the correct position.
The top piece is typically the first to be installed. The side pieces must join the top piece cleanly and extend down to assist in closing the bottom corner gaps.
- Close the garage door completely.
- Take out the old top and side weatherstripping.
- Wash jambs and header.
- Take the measurements of the top piece and side pieces.
- Cut to shape.
- Install the upper one first.
- Attach the side pieces so that they line up with the top seal.
- Gently touch the flexible flange to the door.
- Fasten the trim or seal in place.
- Look for light and drafts from the inside.
The seal must be flat against the door but must not be bent too tightly. Rubbing can result from excess pressure. If the pressure is too low, air gaps will form.
| Correct Fit Test | What To Check |
|---|---|
| Door closed | Seal touches the door evenly |
| Inside view | No daylight along the side or top edges |
| Draft check | Little to no air movement near the frame |
| Door movement | The door opens and closes without rubbing |
| Bottom corners | Side seal meets near the bottom seal area |
Side-bottom contact matters. If the perimeter seal stops too high, water may still enter at the lower corners even with a new bottom seal.
How To Install A Garage Door Threshold Seal
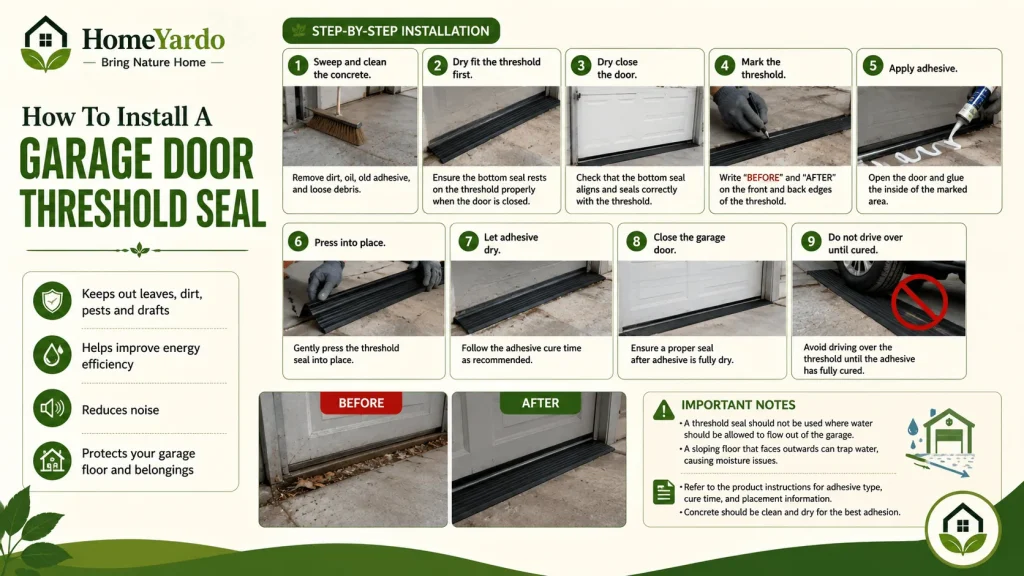
The floor is fitted with a threshold seal. The threshold seal is fitted to the floor. Special care needs to be taken in positioning this due to the use of adhesive.
Dry fit the threshold first, before using adhesive. The bottom seal should rest on the threshold in the proper position when the door is closed.
- Sweep and clean the concrete.
- Clean off oil, dirt, old adhesive, and loose debris.
- Dry fit the garage door and dry close.
- Ensure that the bottom seal is in place properly with the threshold.
- Write “before” and “after” on the front and back edges of the threshold.
- Open the door and glue the inside of the marked area.
- Gently press the threshold seal into place.
- After the adhesive dries, close the garage door.
- Do not drive over the threshold until cured.
A threshold seal should not be used where water should be allowed to flow out of the garage. A sloping floor that faces outwards can cause water to be trapped, resulting in a new moisture issue.
Refer to the product instructions for adhesive type, cure time and placement information. The concrete should be clean and dry so that the adhesive will adhere. If the garage floor also needs a cleaner finished surface, the guide on how to epoxy a garage floor explains how concrete prep, moisture checks, and curing affect the final result.
Why Water Still Comes Under The Garage Door After Replacing The Seal
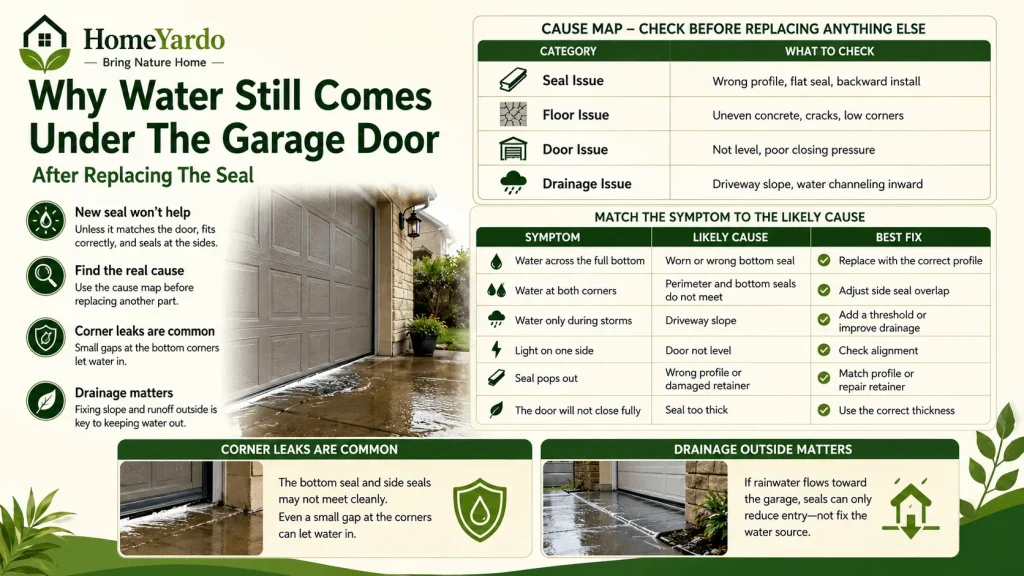
Water may still leak in after replacement if the incorrect issue was resolved. A new bottom seal will assist only if it is the same size as the door, if it is flat against the floor and if it fits correctly at the side seals.
Utilize the cause map prior to replacing another component.
| Category | What To Check |
|---|---|
| Seal issue | Wrong profile, flat seal, backward install |
| Floor issue | Uneven concrete, cracks, low corners |
| Door issue | Not level, poor closing pressure |
| Drainage issue | Driveway slope, water channeling inward |
After that, match the symptom to the likely cause.
| Symptom | Likely Cause | Best Fix |
|---|---|---|
| Water across the full bottom | Worn or wrong bottom seal | Replace with the correct profile |
| Water at both corners | Perimeter and bottom seals do not meet | Adjust side seal overlap |
| Water only during storms | Driveway slope | Add a threshold or improve drainage |
| Light on one side | Door not level | Check alignment |
| Seal pops out | Wrong profile or damaged retainer | Match profile or repair retainer |
| The door will not close fully | Seal too thick | Use the correct thickness |
Corner leaks are common because the bottom seal and garage door side seals may not meet cleanly. If there is a small open pocket at each bottom corner, water can enter even when the center of the door looks sealed.
Drainage outside the garage also matters. If rainwater flows toward the garage, weather stripping may reduce entry, but not fix the outside water source. Once water entry and drainage problems are corrected, polyaspartic garage floor coating may be worth comparing to a faster-curing garage floor finish.
How To Seal Garage Door Gaps By Location
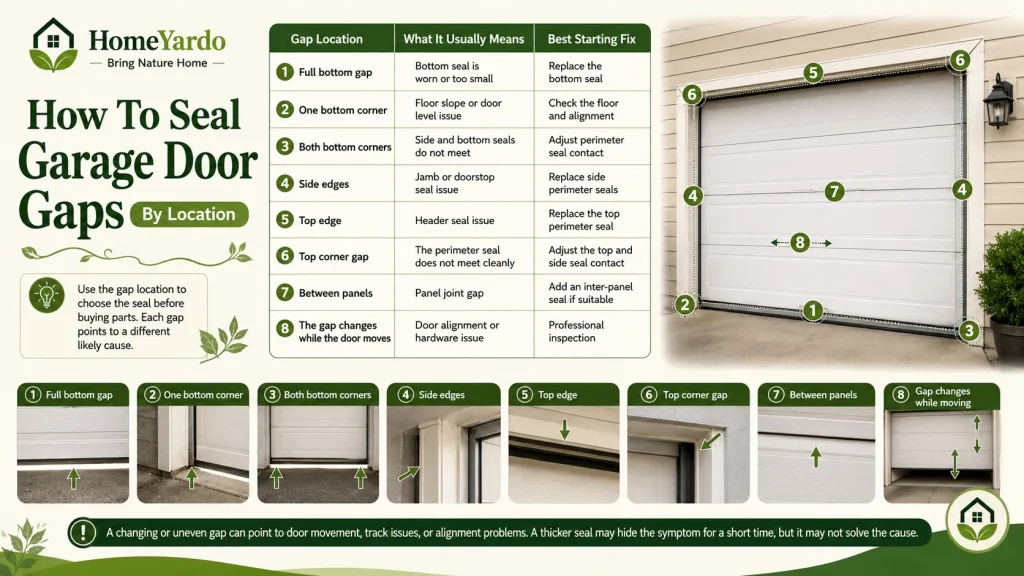
Use the gap location to choose the seal before buying parts. Each gap points to a different likely cause.
| Gap Location | What It Usually Means | Best Starting Fix |
|---|---|---|
| Full bottom gap | Bottom seal is worn or too small | Replace the bottom seal |
| One bottom corner | Floor slope or door level issue | Check the floor and alignment |
| Both bottom corners | Side and bottom seals do not meet | Adjust perimeter seal contact |
| Side edges | Jamb or doorstop seal issue | Replace side perimeter seals |
| Top edge | Header seal issue | Replace the top perimeter seal |
| Top corner gap | The perimeter seal does not meet cleanly | Adjust the top and side seal contact |
| Between panels | Panel joint gap | Add an inter-panel seal if suitable |
| The gap changes while the door moves | Door alignment or hardware issue | Professional inspection |
A changing or uneven gap can point to door movement, track issues, or alignment problems. A thicker seal may hide the symptom for a short time, but it may not solve the cause.
DIY vs Professional Replacement
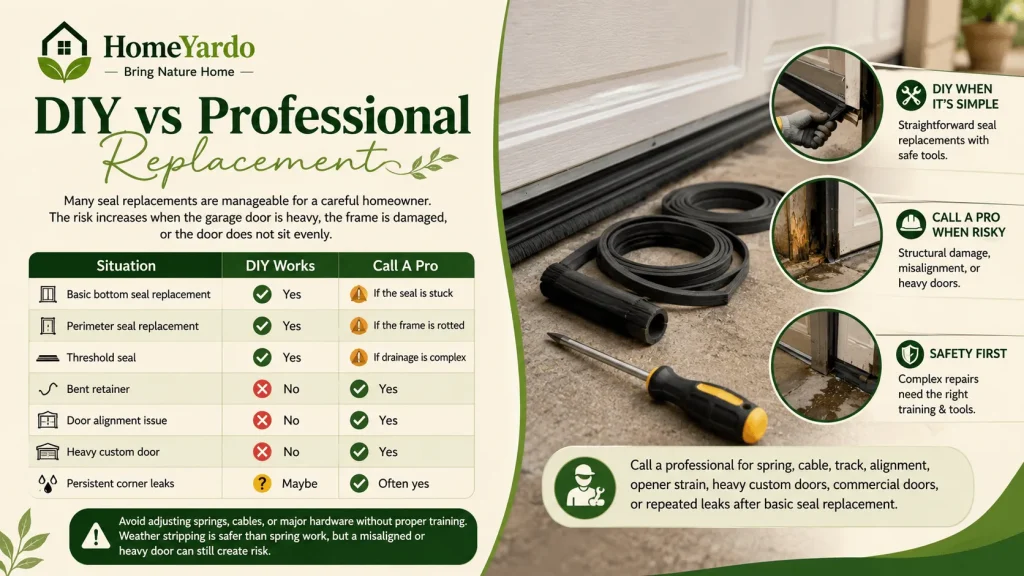
Many seal replacements are manageable for a careful homeowner. The risk increases when the garage door is heavy, the frame is damaged, or the door does not sit evenly.
| Situation | DIY Works | Call A Pro |
|---|---|---|
| Basic bottom seal replacement | Yes | If the seal is stuck |
| Perimeter seal replacement | Yes | If the frame is rotted |
| Threshold seal | Yes | If drainage is complex |
| Bent retainer | No | Yes |
| Door alignment issue | No | Yes |
| Heavy custom door | No | Yes |
| Persistent corner leaks | Maybe | Often yes |
Call a professional for spring, cable, track, alignment, opener strain, heavy custom doors, commercial doors, or repeated leaks after basic seal replacement.
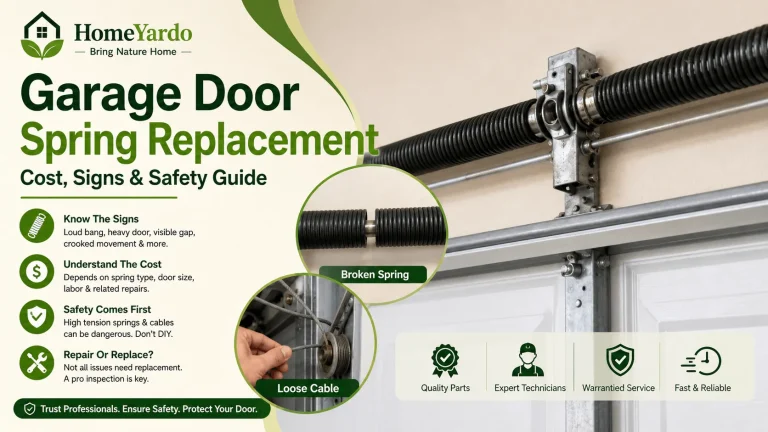
Avoid adjusting springs, cables, or major hardware without proper training. Weather stripping is safer than spring work, but a misaligned or heavy door can still create risk. If the door feels unusually heavy, drops quickly, or will not stay open, review garage door spring replacement before working near the bottom seal or frame.
What Is The Best Garage Door Weather Stripping By Problem
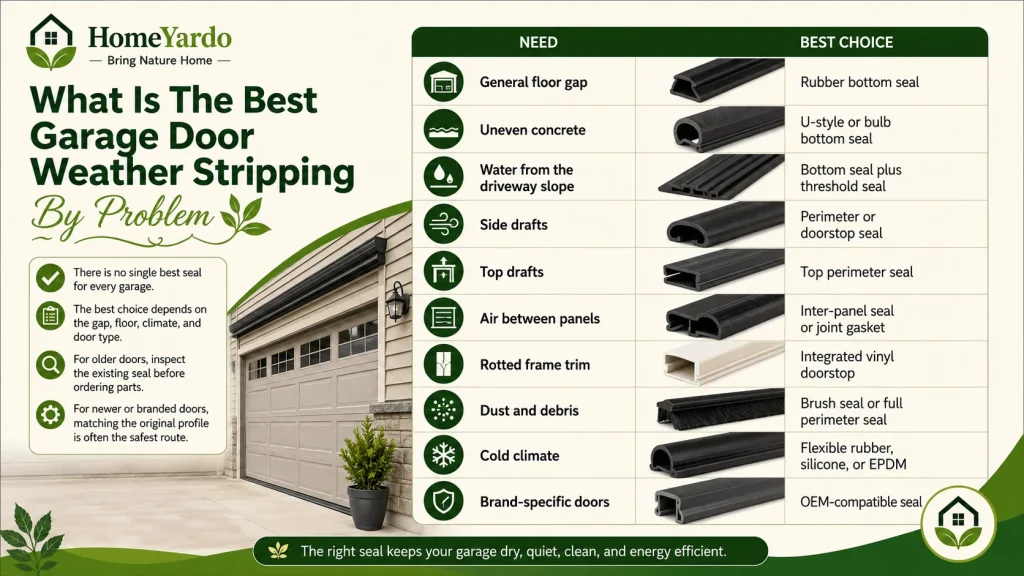
There is no single best seal for every garage. The best choice depends on the gap, floor, climate, and door type.
| Need | Best Choice |
|---|---|
| General floor gap | Rubber bottom seal |
| Uneven concrete | U-style or bulb bottom seal |
| Water from the driveway slope | Bottom seal plus threshold seal |
| Side drafts | Perimeter or doorstop seal |
| Top drafts | Top perimeter seal |
| Air between panels | Inter-panel seal or joint gasket |
| Rotted frame trim | Integrated vinyl doorstop |
| Dust and debris | Brush seal or full perimeter seal |
| Cold climate | Flexible rubber, silicone, or EPDM |
| Brand-specific doors | OEM-compatible seal |
For older doors, inspect the existing seal before ordering parts. For newer or branded doors, matching the original profile is often the safest route.
OEM Vs Universal Garage Door Seals
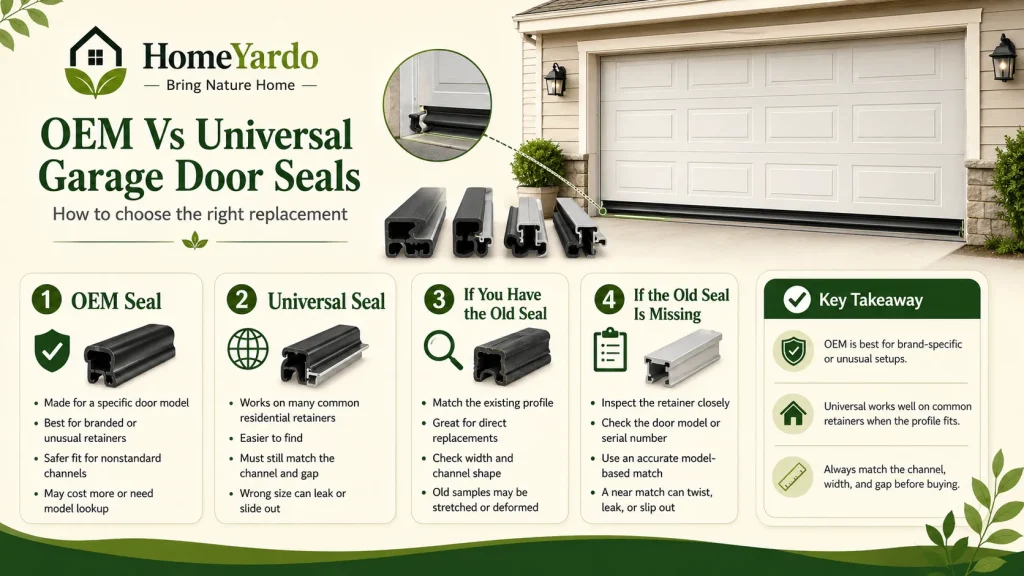
OEM garage door seals are made to match a specific door model or retainer profile. They are usually the safer option when the door has a branded bottom retainer or a nonstandard channel.
Universal seals can work well on common residential retainers, especially when the old seal profile is easy to match. They are usually easier to find, but they still need to match the channel and gap.
| Seal Type | Best For | Watch Out For |
|---|---|---|
| OEM seal | Brand-specific doors and unusual retainers | May cost more or require model lookup |
| Universal seal | Common residential bottom retainers | Must still match profile and width |
| Old seal sample matches | Replacing an existing seal | The old seal may be stretched or deformed |
| Model-based match | Missing old seal | Needs an accurate model or serial number |
If the old seal is missing, inspect the retainer closely and check the door model. A seal that is almost right can still leak, twist, or slide out.
Does Weather Stripping Reduce Energy Bills?
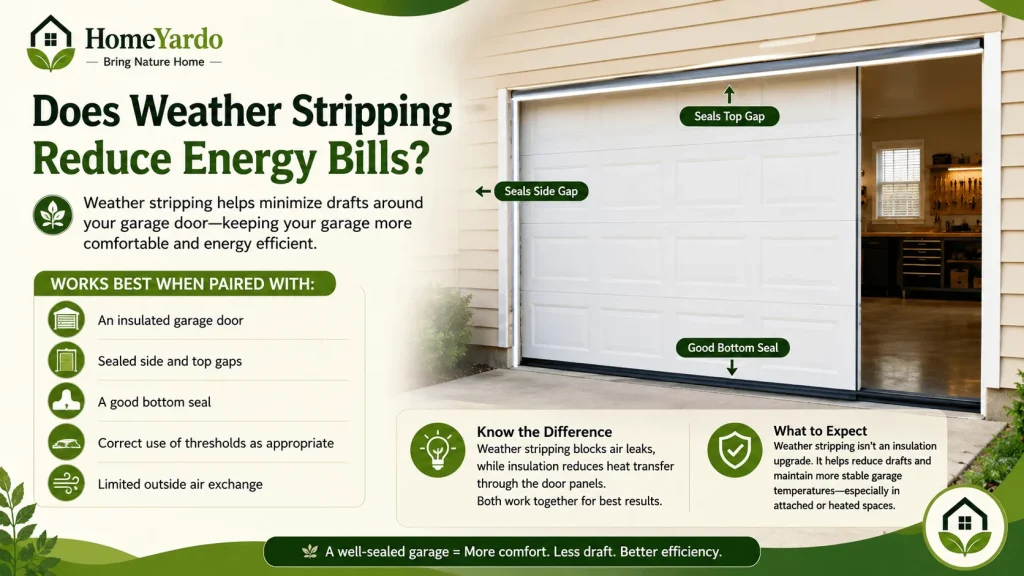
Garage door weather stripping can help minimize drafts around a garage door. It is best suited for attached garages, heated garages, workshops and garages located below living areas.
It works best when paired with:
- An insulated garage door
- Sealed side and top gaps.
- A good bottom seal
- Correct use of thresholds as appropriate.
- Limited outside air exchange
Weather stripping should not be considered an insulation upgrade. It blocks air leaks, and insulation reduces heat transfer through the door panels. Both can work together.
Don’t make precise savings statements without project data. The more conservative statement would be that weather stripping can help to keep garage temperatures more comfortable and stop drafts.
How Long Does Garage Door Weather Stripping Last?
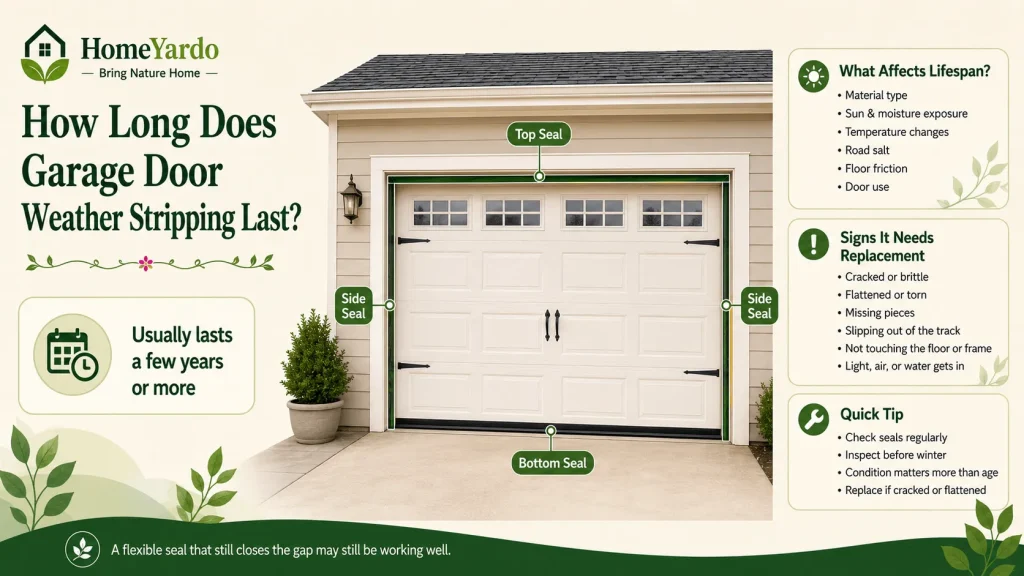
Garage door weather stripping will last for a few years or more. Lifespan is dependent on material, sun exposure, moisture, temperature fluctuations, road salt, floor friction, and door use.
If a seal is:A seal may need replacement sooner if it is:
- Cracked
- Brittle
- Flattened
- Torn
- Missing in pieces
- Getting out of the track
- No longer in contact with the floor or frame.
- Allowing light, air, or water to enter.
Check seals on a regular basis and prior to winter. Condition is more important than age. A seal that appears flexible and that closes the gap might still be of value. If the seal has cracked or flattened, it needs to be replaced.
Maintenance Tips For Longer Seal Life
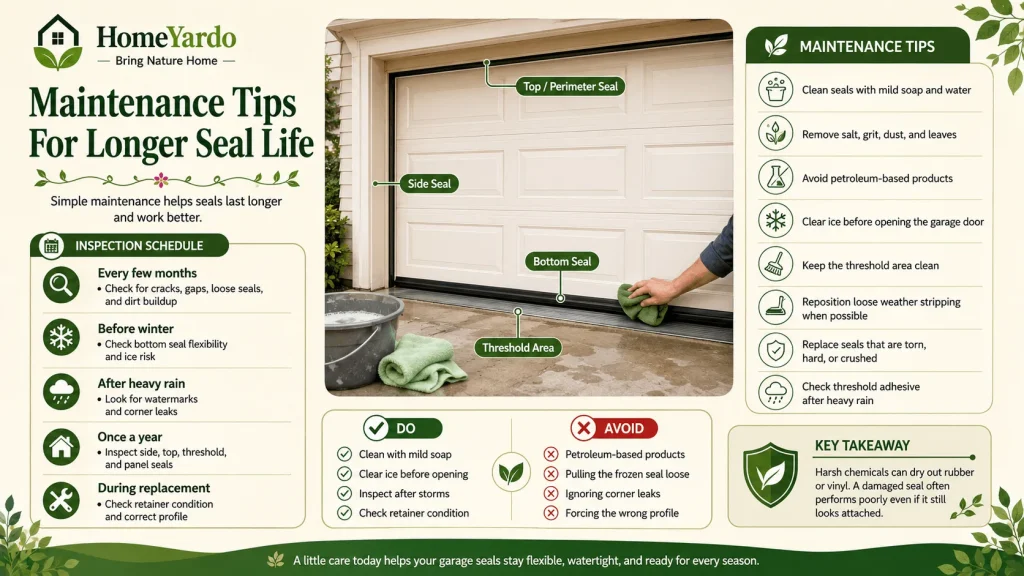
Simple maintenance helps seals last longer and work better.
Use this schedule:
| Timeframe | What To Check |
|---|---|
| Every few months | Cracks, gaps, loose seals, dirt buildup |
| Before winter | Bottom seal flexibility and ice risk |
| After heavy rain | Watermarks and corner leaks |
| Once a year | Side, top, threshold, and panel seals |
| During replacement | Retainer condition and correct profile |
Maintenance tips:
- Clean seals with mild soap and water.
- Remove salt, grit, dust, and leaves.
- Avoid petroleum-based products on rubber or vinyl.
- Clear ice before opening the garage door.
- Keep the threshold area clean.
- Reposition loose weather stripping when possible.
- Replace seals that are torn, hard, or crushed.
- Check the threshold adhesive after heavy rain.
| Do | Avoid |
|---|---|
| Clean with mild soap | Petroleum-based products |
| Clear ice before opening | Pulling the frozen seal loose |
| Inspect after storms | Ignoring corner leaks |
| Check the retainer condition | Forcing the wrong profile |
Do not use harsh chemicals that can dry out rubber or vinyl. A damaged seal usually performs poorly, even if it still looks attached.
Common Mistakes To Avoid
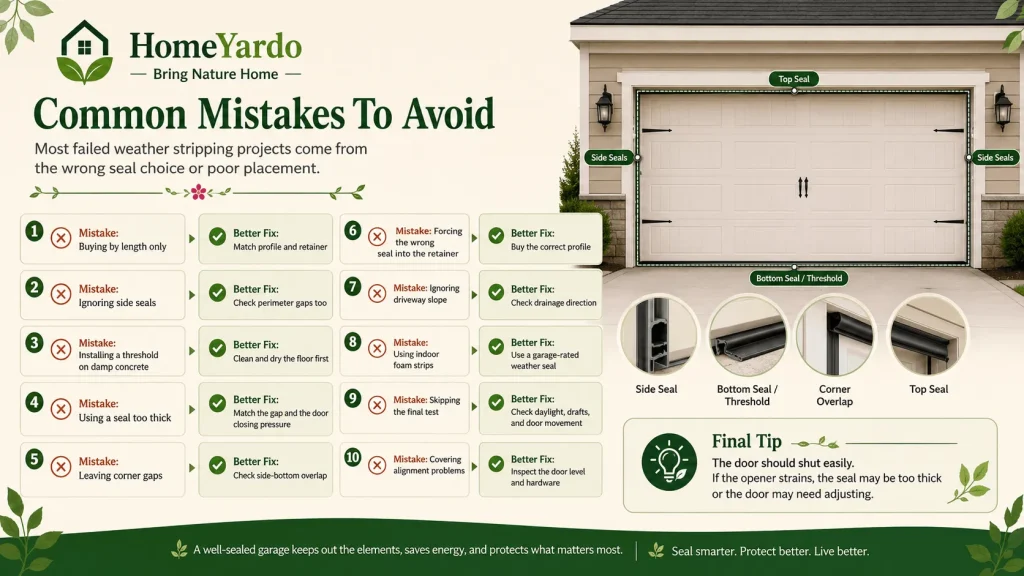
Most failed weather stripping projects come from the wrong seal choice or poor placement.
| Mistake | Better Fix |
|---|---|
| Buying by length only | Match profile and retainer |
| Ignoring side seals | Check perimeter gaps too |
| Installing a threshold on damp concrete | Clean and dry the floor first |
| Using a seal too thick | Match the gap and the door closing pressure |
| Leaving corner gaps | Check side-bottom overlap |
| Forcing the wrong seal into the retainer | Buy the correct profile |
| Ignoring the driveway slope | Check drainage direction |
| Using indoor foam strips | Use a garage-rated weather seal |
| Skipping the final test | Check daylight, drafts, and door movement |
| Covering alignment problems | Inspect the door level and hardware |
The completed door should shut easily. If the opener strains, the seal might be too thick or the door may need adjusting.
Conclusion
The first step to a good garage door seal system is the location of the gap. Seal floor openings with bottom seals. The sides and top are taken care of by perimeter seals. Some water problems can be solved by using threshold seals. Inter-panel seals minimize air flow between panels. Brush seals for dust and rough contact points.
If water, daylight or drafts still exist after replacement, inspect the seal profile, retainer, floor slope, corner overlap and door alignment. The best result is when the seal is matched with the actual problem rather than merely replacing the most conspicuous strip.
Look for areas where daylight, water or air is entering and then match the seal to this exact spot.
FAQ’s
Use a bottom seal that matches the door retainer and gap height. Remove the old seal, clean the channel, slide in the new seal, and test the door from inside. If water remains at the corners, check the side seal overlap.
Yes, many bottom, perimeter, and threshold seals can be replaced by a careful DIY homeowner. Call a professional if the retainer is damaged, the seal is stuck, the frame is rotted, or the door does not close evenly.
Air usually enters through worn bottom, side, top, or panel seals. Check from inside during daylight to find the gap. If the gap is uneven, the door may also need alignment or floor-gap correction.
Start by checking the bottom seal and the floor contact. If water enters at the corners, inspect where the bottom seal meets the perimeter seals. If water runs toward the garage from outside, a threshold seal or drainage fix may be needed.
DIY materials can be low-cost for a simple bottom seal, while a full replacement costs more if side, top, threshold, or specialty seals are needed. Final cost depends on door size, seal profile, labor, and damaged parts.
Measure the door width, old seal profile, retainer channel, and bottom gap height. A seal can match the door length but still fail if the T-width, bead shape, or retainer channel does not fit. Take a photo or a small sample before buying.
Rubber usually compresses well and works better on uneven floors. Vinyl is common, affordable, and handles moisture well. The better option depends on climate, seal location, and how much flexibility the gap needs.
A threshold seal sits on the garage floor where the closed door meets the concrete. Placement depends on the product shape and the bottom seal contact point. Dry fit it with the door closed before applying adhesive.
Good weather stripping can reduce gaps that mice and insects use to enter a garage. A tight bottom seal, perimeter seals, and corner contact help most. If chewing is repeated, consider a rodent-resistant seal and check nearby walls, foundation, and utility gaps too.
A garage door seal may pop out when the profile does not match the retainer, the channel is bent, or the seal is too stiff. Dirt inside the track can also stop the seal from seating properly. Clean the channel and match the old profile before reinstalling.
References
- Cunningham Door
- Clopay Weather Stripping Guide
- Clopay Garage Door Seals Guide
- Overhead Door
- The Spruce
- Express Garage Doors
- Garaga