
Why Flooring Looks Different From the Sample in Your Home

A four-inch flooring sample can look perfect in a showroom and completely different once hundreds of square feet are installed in your home.
That does not necessarily mean the wrong flooring was delivered.
A small sample cannot show how color spreads across an entire room, how natural and artificial light affect undertones, how often grain patterns repeat, or how the floor interacts with cabinets, walls, trim, and furniture.
That is why homeowners sometimes describe the finished floor as warmer, darker, grayer, more orange, or simply different from the sample they originally approved.
Understanding those differences before ordering dozens of boxes can save a costly disappointment.
Why Flooring Samples Can Be Misleading
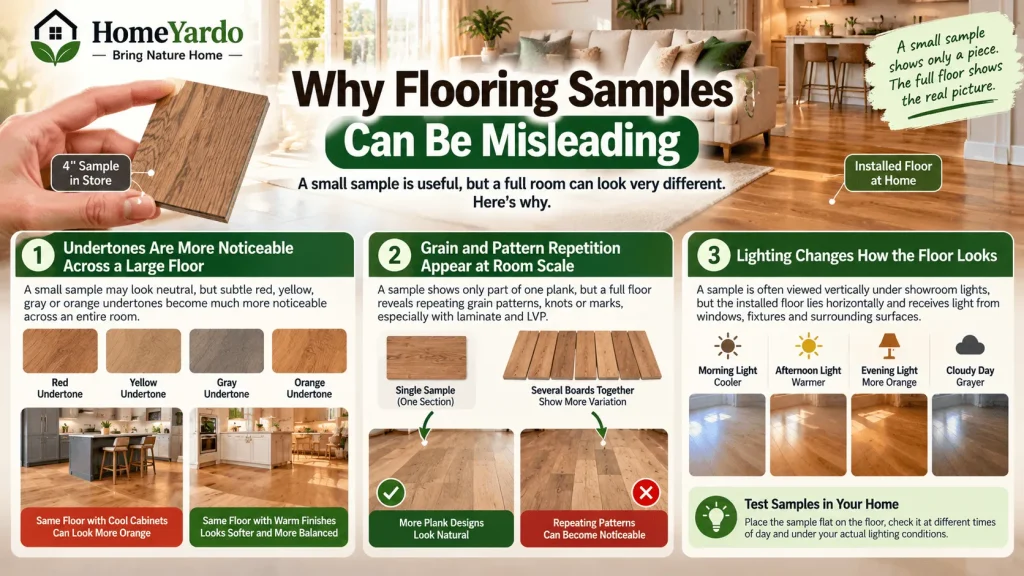
A flooring sample is useful, but it only represents a tiny portion of the finished surface.
Once the material covers an entire room, several visual characteristics become much easier to notice.
Undertones Become More Noticeable Across a Large Floor
A small piece of oak might appear neutral brown while still containing subtle red, yellow, gray, or orange undertones.
Spread that same tone across 500 or 600 square feet and the undertone becomes much more noticeable.
This is particularly important with wood and wood-look flooring because neighboring finishes affect how those tones are perceived.
A warm floor beside cool gray cabinets may appear more orange. The same floor beside cream walls and warm wood furniture may appear softer and more balanced.
Natural woods can also contain considerable board-to-board variation. Homeowners considering materials such as red oak wood flooring should look at several boards rather than judging the entire floor from one small section.
Grain and Pattern Repetition Appear at Room Scale
A sample may show only part of one plank.
That is enough to inspect texture and basic color, but it cannot tell you what dozens of installed boards will look like together.
This matters especially with laminate and luxury vinyl flooring. Wood-look designs are produced using a set of printed plank visuals. When the same knot, grain line, or mark appears repeatedly, the pattern may become noticeable across a large open floor.
Before ordering, ask the retailer or manufacturer how much visual variation the product contains and, where available, how many different plank designs are included.
Seeing several loose boards together is far more useful than inspecting one small chip.
Floors Receive Light Differently Than Vertical Samples
Another problem is orientation.
A flooring sample may be viewed vertically under showroom lights or held close to eye level. The installed material will lie horizontally and receive light from windows, ceiling fixtures, lamps, and reflections from surrounding surfaces.
That difference can noticeably affect how the color appears.
A floor may look cooler on an overcast morning, warmer under afternoon sunlight, and considerably different again after sunset under warm indoor lighting.
For that reason, a sample should be tested where the flooring will actually be installed rather than judged only in a store.
Why Showroom Lighting Can Change the Floor Color
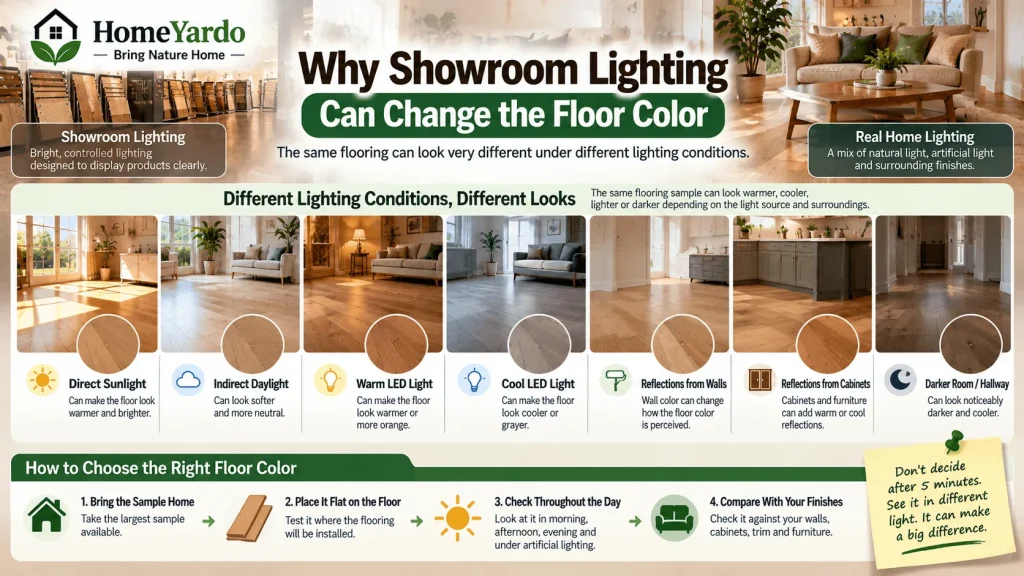
Showrooms are designed to display products clearly, but their lighting may be very different from the lighting inside your home.
Your room may contain a mixture of:
- Direct sunlight
- Indirect daylight
- Warm LED bulbs
- Cool LED bulbs
- Light reflected from painted walls
- Light reflected from cabinetry and furniture
Each can change how the same finish appears.
Room orientation matters as well. A floor near a large sunny window may appear quite different from the same material in a darker hallway.
The safest approach is simple: bring the sample home, place it flat on the existing floor, and check it throughout the day.
Do not make the decision after looking at it for five minutes.
How Flooring Brands Create Room Images
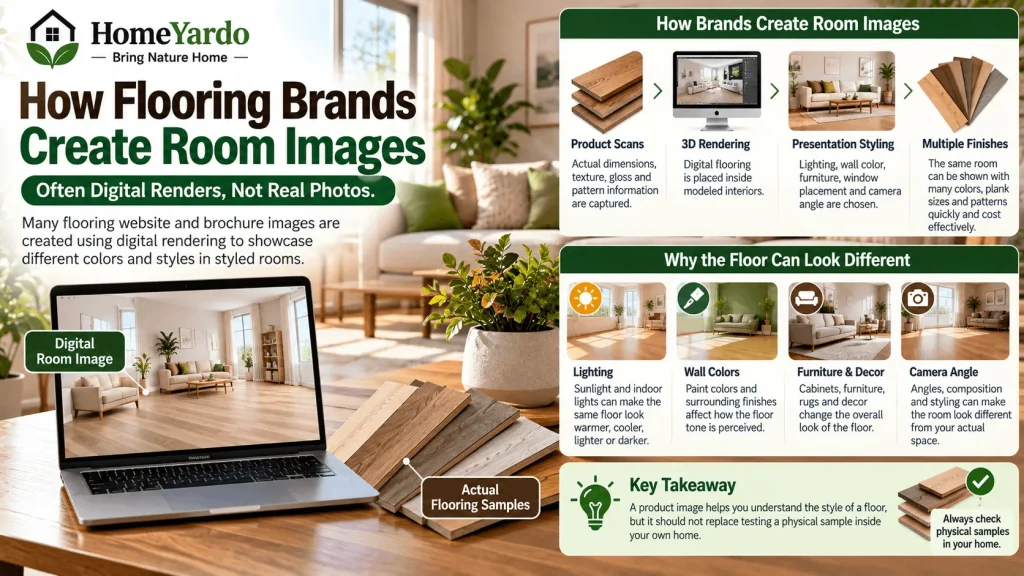
The attractive room shown on a flooring website or product brochure may not have been physically built and photographed for every available flooring color.
Creating a real room for every finish would be expensive and slow, especially when a product collection contains many colors, plank sizes, and patterns.
Instead, brands can use flooring rendering to place digitally recreated flooring materials inside modeled interiors.
High-quality workflows can use product scans, actual dimensions, surface texture, gloss, embossing, and pattern information to represent the flooring realistically.
The flooring itself may therefore be modeled closely from the real product.
The room surrounding it is still a presentation environment.
Lighting, wall color, furniture, window placement, styling, and camera angle are chosen for that image.
Those choices affect how the floor looks.
A product image should therefore help you understand the style of a floor, but it should not replace testing a physical sample inside your own home.
Are Flooring Visualizer Tools Accurate?
Most large flooring brands now have a room visualizer on the site, where you upload a photo of your room and see the product in it.
These are genuinely useful for one thing: comparing options against each other in your own space. If you are torn between three colors, the visualizer will show you which one fights with your cabinets.
They are less reliable as an absolute preview. The tool is compositing a flat material into a photograph with whatever light that photograph had, and the result tends to be cleaner and more uniform than a real floor. Use it to narrow the list, not to make the final call.
What to Check Before Ordering Flooring

A little extra checking before purchase is much easier than dealing with forty boxes of flooring you no longer like.
Get the Largest Sample Available
A small swatch tells you the basic color.
A full plank tells you much more.
It reveals:
- Actual plank width
- Grain scale
- Knots and markings
- Texture
- Beveled edges
- Finish sheen
- Color variation across the board
If a retailer cannot provide a full board, ask whether you can purchase one plank or a sample carton.
Put the Sample Flat on the Floor
Do not hold it against the wall.
Place it exactly where the new flooring will go.
Move it near windows, into darker corners, beside doorways, and into connecting rooms.
The material needs to work across the whole space, not only in the brightest part of the room.
Check It Morning, Afternoon, and Night
Leave the sample in the room for at least a few days if possible.
Look at it in:
- Morning daylight
- Strong afternoon light
- Cloudy conditions
- Evening artificial light
A color that looks neutral at midday may become much warmer once the lamps are switched on.
Compare It With Permanent Finishes
Paint can usually be changed fairly easily.
Cabinetry, stone countertops, fireplace surrounds, built-ins, and trim are much more expensive to replace.
Compare the flooring directly against the finishes that are staying.
A beautiful plank that clashes with your cabinets is still the wrong floor for that room.
Look at Several Boards Together
This is especially important with wood, laminate, and luxury vinyl plank.
One board cannot show the full range of variation.
If you are planning an LVP installation, review the material alongside the practical considerations covered in HomeYardo’s guide to luxury vinyl plank flooring.
Lay several boards next to one another before the installer begins whenever possible.
That can reveal unexpected variation or obvious repeated patterns while there is still time to reconsider the layout.
Ask About Production-Lot Variation
Natural materials vary by nature, while manufactured flooring can also show some variation between production runs.
Ask whether cartons should come from the same production lot and check the manufacturer’s installation guidance before the work begins.
Keeping spare material from the original installation can also make future repairs easier because an exact visual match may be harder to obtain years later.
The Room Matters More Than the Individual Plank
Flooring never exists in isolation.
It sits underneath almost every major visual element in a room.
Wall paint, cabinets, rugs, sofas, curtains, countertops, natural light, and artificial lighting all influence how the floor is perceived.
Consider a medium-dark wood floor.
In a north-facing room with gray furniture and limited natural light, it may make the room feel much darker.
Place the same material in a bright room with warm-white walls, large windows, and lighter furniture and it may appear completely different.
This is why evaluating flooring inside the actual room matters more than deciding whether the isolated plank looks attractive.
Do Not Forget the Direction and Layout of the Planks
Color is not the only characteristic that changes once flooring covers an entire space.
Plank direction also affects the finished appearance.
Long boards running through the main sightline can emphasize the length of a room. A different orientation may visually widen the same space.
Transitions between hallways, adjoining rooms, stairs, and doorways should therefore be considered before installation starts.
The layout also affects where highly distinctive boards or repeated printed patterns appear.
A good installer can plan the boards so obvious features are distributed naturally rather than concentrated in one visible area.
The Subfloor Changes How Flooring Feels and Sounds
Sometimes the disappointment has nothing to do with color.
A floor can look exactly as expected and still feel wrong underfoot.
The subfloor, underlayment, installation method, room size, and surrounding hard surfaces can all affect how the finished floor sounds and feels.
A floating floor over concrete may sound different from flooring installed over a wood-framed subfloor.
Large rooms with hard walls, little upholstery, and minimal soft furnishings can also produce more noticeable sound reflection.
Before installation, discuss:
- Existing subfloor condition
- Flatness requirements
- Moisture concerns
- Recommended underlayment
- Installation method
- Sound expectations
- Manufacturer requirements
These decisions are much harder to change after the flooring has been installed.
A Better Way to Choose Flooring Before Buying
Instead of choosing a floor from one showroom sample, use a simple elimination process.
Start with several products you like.
Use website photos and room visualizers to compare styles and narrow the selection.
Then take physical samples home.
Compare them against your cabinets, trim, countertops, and furniture.
Inspect them at different times of day.
Get full-size boards or several pieces whenever possible.
Only then should you make the final choice.
The goal is not to find a plank that looks perfect under showroom lighting. It is to find a floor that continues to look right once hundreds of those planks become part of your home.
Why Flooring Looks Different From the Sample: The Bottom Line
A flooring sample is a reference, not a miniature version of the finished room.
Scale makes undertones stronger. Multiple boards reveal variation and repeating patterns. Your windows and light bulbs change the way color appears. Cabinets and walls affect how warm or cool the floor feels.
Digital room images and visualizer tools can help narrow your choices, but they should support physical testing rather than replace it.
Before ordering a full floor, look at the largest sample you can obtain, place it flat in the actual room, compare it with permanent finishes, and live with it through several lighting conditions.
A few extra days of testing can prevent years of staring at a floor that looked completely different when it was only four inches wide.
FAQ’s
A small sample cannot show the full effect of room-scale color, board variation, pattern repetition, surrounding finishes, or changing light. Once flooring covers a large area, subtle undertones and grain characteristics become much easier to see.
It can appear either lighter or darker depending on the room. Window direction, artificial lighting, wall colors, furniture, sheen, and the amount of flooring visible all affect the finished appearance.
Yes. Place the samples flat in the room where the flooring will be installed and check them during different times of day. Compare them directly with cabinets, trim, countertops, and furniture that will remain in the room.
A flooring visualizer is best used for comparing colors and styles rather than predicting the exact finished appearance. Your photograph, screen, lighting, and the real flooring surface can all change how the final material looks.
Yes. A larger sample gives you a better view of grain, texture, plank width, knots, color variation, and finish. Several full boards together provide an even better idea of how the installed floor may look.
Warm red, yellow, or amber undertones may be subtle on one small board but much more noticeable when repeated throughout a room. Warm lighting, nearby paint colors, cabinetry, and the floor finish can make those undertones appear stronger.
There is no required number, but comparing several shortlisted options in the same room makes differences easier to see. Once you narrow the choices, larger samples or several boards from the preferred product are more useful than collecting many small swatches.
Keeping spare material from the original installation is generally useful for future repairs. A later production run may not provide an identical visual match, and discontinued products can be difficult to replace.