How To Plan A Whole-Home Electrical Upgrade Before Renovation

The most costly error in a home improvement is neglecting to create the electrical plan. Homeowners re-paint, re-tile, hang new cabinets, and six months later, they have no room for a new induction cooktop, EV charger or HVAC unit. This involves making cuts in fresh drywall. Again. The solution is easy: not after the walls are torn down, but before.
Whether you’re updating one room or renovating the whole house, electrical work should be coordinated with the rest of your planning your home improvement project process so wiring, finishes, fixtures, and future upgrades are considered in the right order.
Start With A Load Audit, Not A Wishlist

Most renovation planning starts with Pinterest boards. While it’s OK for looks, your electrician requires something more specific: a load audit. This requires counting all the devices, appliances and systems that will consume electricity once the remodeling is complete, including those that you have yet to purchase.
Drag the label of the existing panel. It will display total amperage (typically 100A or 200A) and the number of breaker slots that are open. A typical 100 amp panel for a 1970s home does not have much space for a modern kitchen, home office and Level 2 EV charger. There are likely going to be some panel upgrades that need to be completed before any of the finish work will make any sense.
| Tier | Load Category | Examples | Plan For It Now? |
|---|---|---|---|
| 1 | Existing essentials | HVAC, water heater, fridge, lighting | Yes, always |
| 2 | Renovation additions | Induction range, EV charger, home office circuits | Yes, required |
| 3 | Future likely loads | Hot tub, generator hookup, workshop tools | Pre-wire now, connect later |
Pre-wiring for Tier 3 items costs very little during a renovation when walls are already open. Doing it afterward can cost several times more.
The EV Charger Question Nobody Plans For

This section is the most important in the article if you own an electric vehicle or are looking to purchase an EV in the next few years. A Level 2 home charger usually will need a separate 240 volt, 50 amp circuit. For homeowners comparing different EV charging solutions, it’s also important to consider the charger’s power requirements and whether the home’s electrical panel can support the installation. That’s a decent draw on your panel, and it has to be designed before completing the walls of your garage.
The U.S. Department of Energy’s ENERGY STAR program estimates that 80 percent of EV charging will occur at home, and there is an increasing demand among consumers for homes that are ready or prepared for EV charging. The number is correct. Public charging is improving, but even at home overnight is better than a public charger!
The practical move is to run the conduit and wire the circuit during your renovation even if you’re not buying an EV this year. The wire is cheap. The labor is the expensive part, and you’re already paying for it. If you’re in the DFW area and want a realistic quote for what that circuit actually costs alongside other renovation electrical work, a lake dallas electrician can assess your panel capacity and map out the full scope before you commit to a timeline.
Aging Wiring Is A Renovation Multiplier

Surprises are discovered within walls during renovations. The older a house is, the more probable it is that the wiring may be in need of repair the second you uncover it. Homes built before 1980 are likely to have aluminum branch wiring from the 1960s or ’70s, knob and tube wiring, or ungrounded two-prong outlets.
The NFPA estimated that between 2016 and 2020, Electrical Distribution and Lighting Equipment caused an average of 30,740 fires, 390 of which were fatal, 1,090 of which resulted in injuries and $1.4 billion in losses each year. Most of those incidents are the result of ageing or maintenance issues. When the walls are open, the best time to deal with wiring is during a renovation. The financial savings from skipping it tends to end up costing you more in the long run and could cost you in terms of safety risks as well.
When you get bids, ask each electrician to include a visual inspection of the wiring in any wall cavity that will be opened. That inspection is not a separate service. It’s what a thorough contractor does as a matter of course.
Panel Sizing: Get It Right The First Time

This is where many homeowners make the mistake of undersizing. They make plans for their needs now, and they don’t think about what they will need in three years. For a pretty big remodel, such as a kitchen remodel, garage conversion, or addition, you likely will need to consider your panel before work starts.
A 200-amp panel is the current baseline for new construction and most full renovations. Some high-load homes benefit from a 400-amp service or a subpanel feeding a detached structure. The specific number depends on your load audit from Tier 1 through Tier 3 above. Your electrician runs that calculation; your job is to bring accurate information about every load you’re planning.
The thing about panel upgrades while renovating: it’s when. Schedule the rough-in of the panel before the upgrade. If the electrician changes the panel in the middle of the rough-in, you could be left with rerun circuits that were sized to the original panel. Rough-in work before the panel is done and finish work before rough-in work.
Smart Devices And Dedicated Circuits
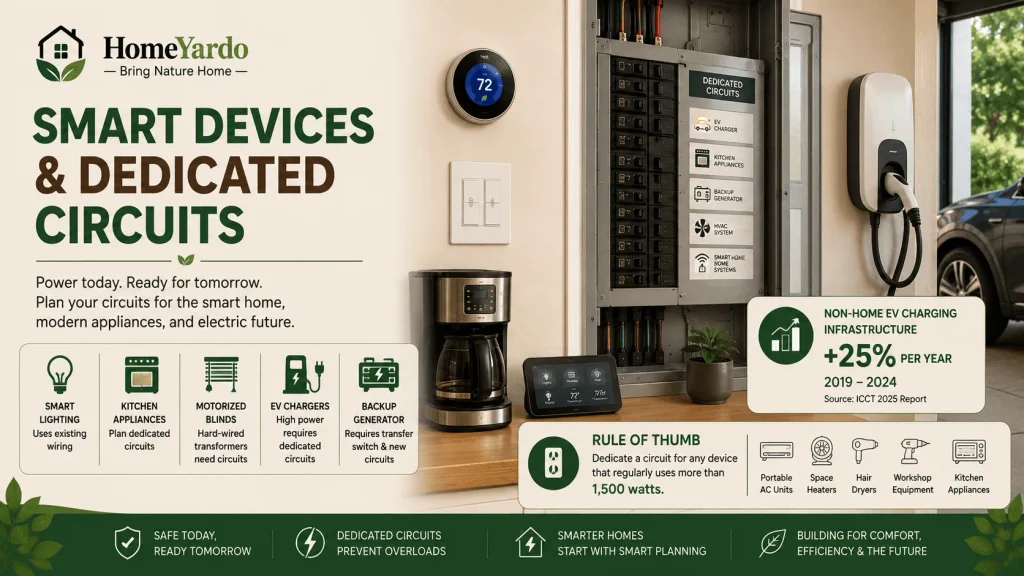
The electrical power requirements of smart home devices wander around a lot. A smart thermostat consumes minimal energy. A whole home backup generator needs a transfer switch, and possibly a new dedicated circuit. Most of the smart lighting systems are powered with the existing wiring. Smart kitchen appliances, motorized blinds (hard-wired transformers), and EV chargers require circuits to be installed ahead of time.
The deployment rate of non-home EV charging infrastructure increased by approximately 25% per year from 2019 to 2024, as per the International Council on Clean Transportation’s 2025 report. The adoption rate reflects the growth rate of residential electricity demand. Buildings that are not connected for tomorrow’s applications are a step behind today’s renovations.
A rule of thumb: Dually power a device if it consumes more than 1,500 watts regularly. That includes most of the portable AC units, space heaters, hair dryers and workshop equipment. It also includes any kitchen appliance that has a heating component – this includes a toaster oven and a high-end coffee machine.
Fixed electrical features also need to be considered before walls and room layouts are finalized. Even decisions such as electric fireplace placement can depend on room layout, access to electrical power, furniture positioning, and installation requirements.
Your Pre-Renovation Electrical Checklist

Before your contractor breaks ground, work through these five checkpoints:
- Complete your Load Tier audit. List every current and planned device by tier. Share that list with your electrician before the bid, not during rough-in.
- Identify your panel’s current capacity and available slots. If you have fewer than four open slots or are running close to your service capacity, budget for a panel upgrade as part of the project.
- Decide on EV readiness. Even if you don’t own an EV, pre-wiring the garage circuit now is far cheaper than doing it later when the walls are finished.
- Ask about existing wiring in open cavities. Any wall that gets opened should get an inspection. Flag aluminum wiring, ungrounded outlets, or any wiring without a ground wire for immediate remediation.
- Sequence correctly. Panel upgrade and rough electrical work come before insulation, drywall, and finish work, in that order, every time.
That checklist sounds obvious once it’s written down. But most renovation cost overruns trace back to a homeowner or a general contractor who skipped one of those five steps and had to open finished walls to fix it.
Apply the same planning to individual rooms. When working through bathroom remodeling ideas, for example, outlet, switch, mirror, and lighting locations should be settled early enough for the electrical work to happen before finished surfaces go in.
The Cost of Getting The Sequence Wrong

Imagine that you remodeled your kitchen, installed new cabinets and tile and then want to upgrade to an induction range to take the place of a gas range. The induction unit requires 240 volt, 50 amps. Your panel is full. The electrician will need to run a new circuit from the panel to the kitchen which requires cutting a hole in the new dry wall and repainting. This will cost more to repair than the circuit that was planned for.
“The best time to address electrical capacity is before any finishes go in. Once the walls are closed, every change carries a premium.”
This reflects a consensus position among residential electrical contractors and has been echoed consistently in NFPA’s guidance on renovation safety planning.
Good renovation planning means treating the electrical system as the foundation of every other upgrade, not an afterthought. Your finishes are only as future-proof as the wiring behind them.
Final Takeaway
When it comes time to do a whole house electrical upgrade, the ideal time to do it is prior to the completion of renovations that make the wiring inaccessible. Identify current and future loads, get existing system evaluated, plan circuits and electrical capacity with a qualified electrician, and schedule rough-in with the renovation project. That preparation can avert the demolition work later, when the electricity changes.
FAQ’s
Not automatically. Determination of need for upgrade will depend on existing electrical system, calculated load, condition of existing wiring, equipment to be added, scope of renovations, and applicable local code.
Typical new wiring or other rough electrical work should be finished and be rougly inspected before closing walls. The order of construction should be planned in conjunction with the contractor, electrician and local inspection needs.
A licensed electrician can conduct a load calculation to determine if the existing service, panel rating, breaker configuration and proposed new loads are correct. Don’t just assume that empty spaces on the breaker mean that there is adequate electrical capacity.
Not necessarily. There is no standard size that is right for every renovation. The required is determined by the home’s calculated electrical needs and the requirements that apply to the home.