Why Balcony and Rooftop Waterproofing Fails and What to Check Before Installation
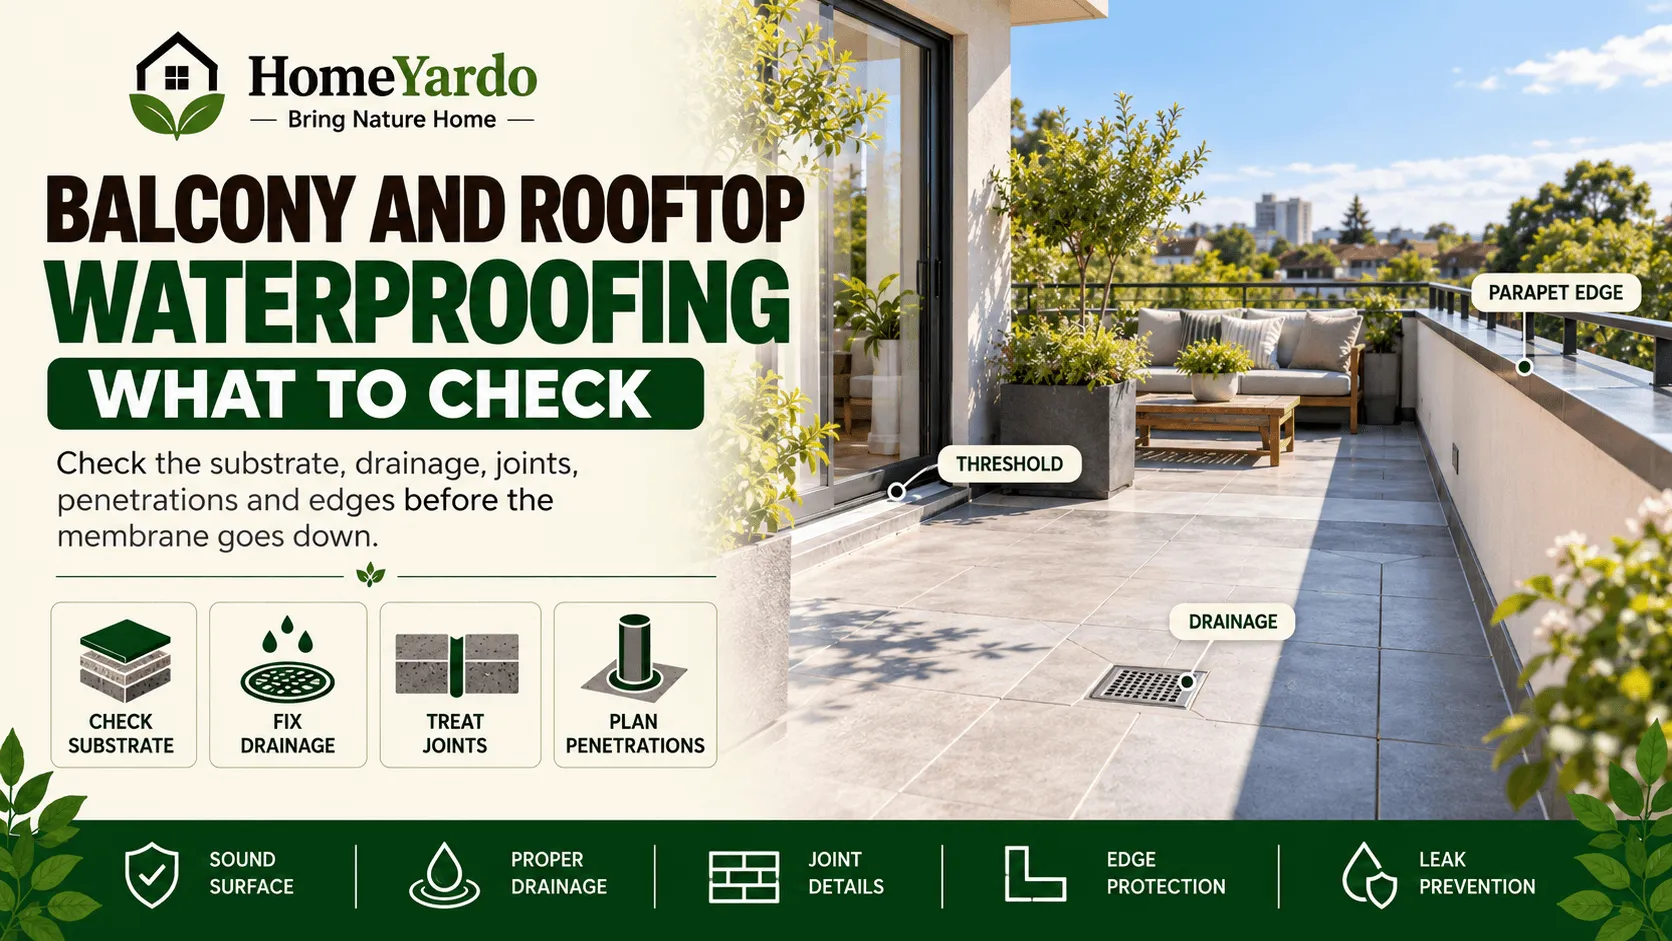
Balconies and rooftops face some of the harshest conditions on a building. Rain, standing water, direct sunlight, temperature changes, building movement and regular foot traffic can all place stress on a waterproofing system.
Yet when waterproofing fails, the membrane itself is not always the original cause.
Problems may begin with an unsuitable or poorly prepared substrate, inadequate drainage, untreated cracks, badly detailed penetrations or work by other trades after waterproofing has been completed.
That is why successful balcony and rooftop waterproofing starts before the membrane goes down. The substrate, drainage, joints, penetrations, edges and surrounding building elements should all be checked before installation.
Why Balcony and Rooftop Waterproofing Systems Fail
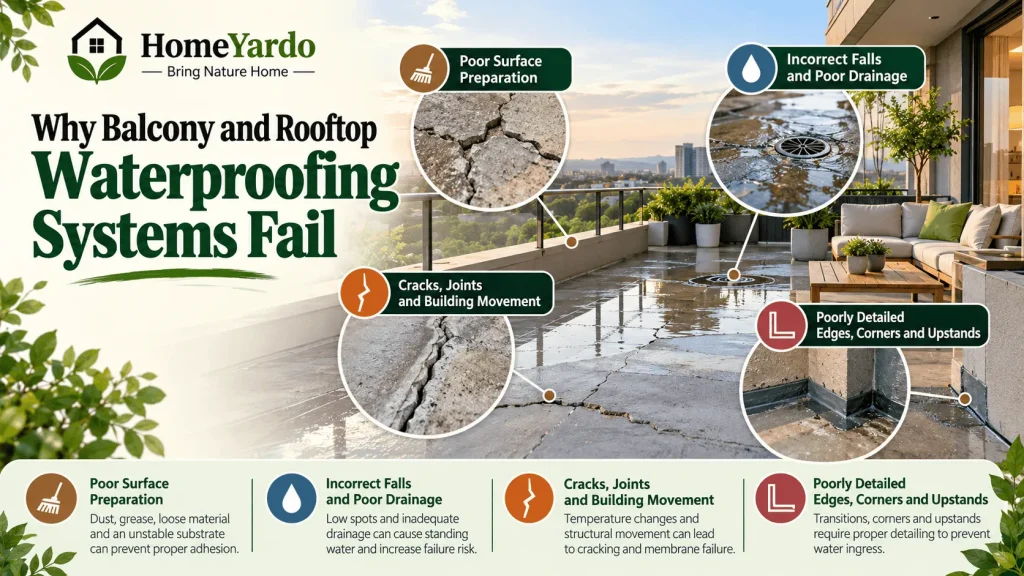
A waterproofing membrane works as part of a complete assembly. Its performance depends on what lies underneath it and how it connects with drains, walls, thresholds, penetrations and other building elements.
Several conditions can increase the risk of premature failure.
Poor Surface Preparation
The substrate provides the foundation for the waterproofing system.
Dust, grease, loose material, laitance, excessive moisture, contaminants or an unstable surface can interfere with adhesion. Existing cracks and damaged sections can also create weak points if they are simply covered rather than properly assessed and treated.
Before installation, the substrate should be inspected to determine whether it is sound and suitable for the selected waterproofing system.
Preparation may include:
- Removing dust, dirt and loose material
- Cleaning contaminants from the surface
- Repairing suitable cracks and surface defects
- Removing incompatible existing coatings where required
- Checking substrate moisture
- Applying the specified primer
- Allowing repair products or substrates to cure or dry as required
The exact preparation method should follow the membrane manufacturer’s specifications rather than a one-size-fits-all procedure.
Incorrect Falls and Poor Drainage
Waterproofing and drainage perform different jobs.
A membrane is intended to prevent water from entering the building assembly, while falls and drainage direct water toward outlets. Installing a membrane over an area with poor drainage does not correct the underlying geometry.
Low spots may allow water to pond around drains, thresholds, penetrations or changes in level.
Before waterproofing begins, check:
- Surface falls
- Drain locations
- Overflow provisions
- Low points
- Changes in level
- Areas where water could become trapped
Drainage problems are much easier to address before the waterproofing and finished surface have been installed.
Homeowners dealing with broader roof-water management issues may also find it useful to understand how trees, gardens and drainage affect roof lifespan.
Cracks, Joints and Building Movement
Exterior building surfaces do not remain completely motionless.
Temperature changes can cause materials to expand and contract. Different materials can also move at different rates, while structural and construction joints may be designed to accommodate movement.
Cracks, control joints, expansion joints and transitions between materials therefore require individual assessment.
Simply coating over every joint with a continuous layer of membrane may not provide an appropriate long-term detail.
The waterproofing system and joint treatment should be selected according to the substrate, expected movement and manufacturer’s installation requirements.
When specified for the particular substrate and application, polyurea membranes from suppliers such as ZOCOO Australia can be considered for exposed areas such as rooftops and balconies. Product selection should still account for substrate compatibility, preparation requirements, movement, exposure conditions and the manufacturer’s installation specifications.
Poorly Detailed Edges, Corners and Upstands
Flat areas are only one part of balcony and rooftop waterproofing.
Failures often develop around transitions where the membrane has to change direction or terminate.
These locations can include:
- Wall-to-floor junctions
- Internal and external corners
- Parapets
- Door thresholds
- Upstands
- Drains
- Roof edges
- Changes in substrate or level
These details should be planned before application rather than improvised while the membrane is being installed.
Check Every Penetration Before Waterproofing
Every object passing through the waterproofed area creates another detail that needs to be managed correctly.
Common penetrations include:
- Pipes
- Conduits
- Balustrade posts
- Drains
- Anchors and fasteners
- Service supports
- Mechanical equipment connections
Their locations should be identified before waterproofing begins whenever practical.
Drilling new holes through a completed membrane can compromise an otherwise continuous system. It may also leave the waterproofing contractor trying to seal a detail that was never included in the original installation plan.
Early coordination allows penetrations to be incorporated into the waterproofing design rather than treated as later modifications.
Coordinate Rooftop Equipment Before the Membrane Goes Down
Rooftops may contain air-conditioning equipment, ductwork, pipework, solar equipment and other mechanical or electrical services.
Their supports, penetrations, plinths and maintenance access requirements should be established before waterproofing.
Where a roof carries air-conditioning or other mechanical plant, a mechanical designer such as EVC Engineering can coordinate equipment, penetrations and plinth positions before the membrane goes down.
Early coordination reduces the chance of a later trade cutting through completed waterproofing, installing fixings in unsuitable locations or placing equipment where drainage and membrane maintenance become difficult.
What to Check Before the Waterproofing Membrane Goes Down
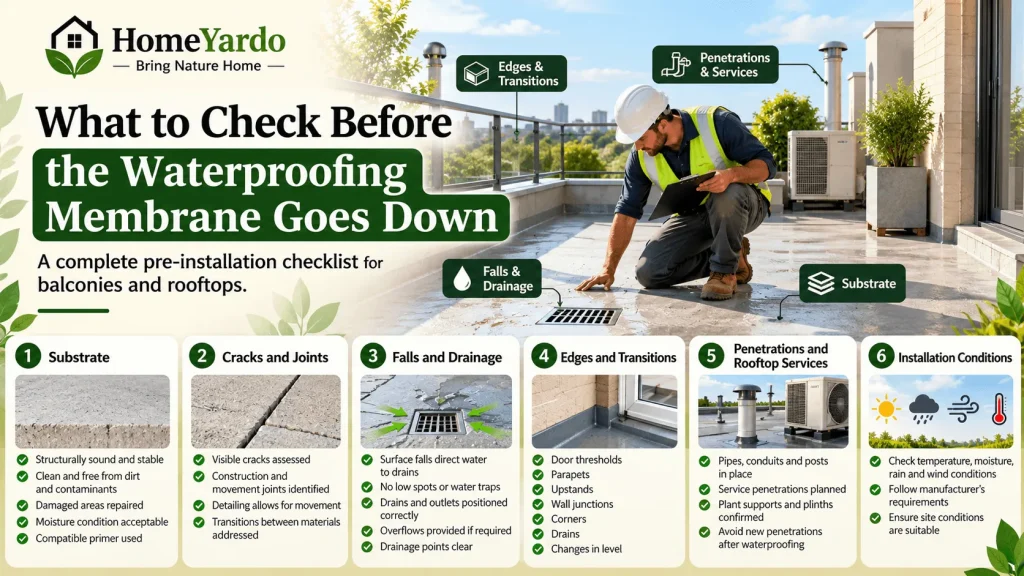
A pre-installation inspection can identify conditions that would otherwise be hidden beneath the completed waterproofing system.
Before work starts, confirm the following.
Substrate
- Is the substrate structurally sound and stable?
- Is it clean and free from loose material and contaminants?
- Have damaged areas been properly repaired?
- Is its moisture condition acceptable for the selected system?
- Is the required primer compatible with both the substrate and membrane?
Cracks and Joints
- Have visible cracks been assessed?
- Have construction and movement joints been identified?
- Does the proposed detailing accommodate expected movement?
- Are transitions between different materials properly addressed?
Falls and Drainage
- Does the surface direct water toward drains?
- Are there obvious low spots or water traps?
- Are drains and outlets positioned correctly?
- Are overflows provided where required?
- Are drainage points clear and ready for integration with the waterproofing system?
Edges and Transitions
Check how waterproofing will terminate or continue at:
- Door thresholds
- Parapets
- Upstands
- Wall junctions
- Corners
- Drains
- Changes in level
These areas should have defined installation details before work begins.
Penetrations and Rooftop Services
Confirm that pipes, conduits, balustrade posts, service penetrations, plant supports and plinths are in their intended locations.
Where practical, avoid adding penetrations after waterproofing has been completed.
Installation Conditions
Temperature, moisture, rain, wind and substrate conditions can affect the application of some waterproofing products.
Check the product’s technical requirements and confirm that site conditions fall within the manufacturer’s specified limits before installation begins.
Do Not Hide Existing Problems Under a New Membrane
A new waterproofing membrane should not be used to conceal unresolved defects.
If the substrate is unstable, badly cracked, incorrectly graded or otherwise unsuitable, covering it may leave the original problem underneath the new system.
The same principle applies to drainage.
Waterproofing may prevent moisture from passing directly through a surface, but it cannot compensate for every drainage or construction defect.
This is especially important at doorways, parapets, drains, wall-to-floor junctions and changes in level, where several building elements meet.
Preparation work can appear less important because it disappears once the project is finished. In reality, hidden preparation often determines how well the finished work performs. HomeYardo’s guide to saving money on home renovation without sacrificing quality similarly explains why unresolved moisture and inadequate preparation should not simply be covered with new materials.
Match the Waterproofing System to the Application
Not every waterproofing product is suitable for every balcony or rooftop.
Selection may depend on:
- Substrate material
- Expected movement
- UV exposure
- Foot traffic
- Whether tiles or pavers will cover the membrane
- Drainage design
- Required curing time
- Existing coatings
- Local climate
- Compatibility with primers, sealants and adjoining materials
Rather than selecting a membrane based on one characteristic, such as curing speed or flexibility, consider the complete waterproofing assembly and the conditions it will experience.
Manufacturer technical documentation should be checked for preparation, application, curing, compatibility and environmental limitations.
When Should You Call a Professional?
Some waterproofing preparation can be visually inspected by a property owner, but significant defects should be assessed by an appropriately qualified professional.
Professional input is particularly useful when there is:
- Significant or recurring cracking
- Suspected structural movement
- Persistent ponding
- Uncertain drainage design
- Complex rooftop mechanical equipment
- Multiple penetrations
- Previous waterproofing failure
- Moisture damage beneath an existing system
- Difficult thresholds or building junctions
Requirements can also vary by building type, location and waterproofing application, so applicable building regulations, manufacturer specifications and project documentation should be followed.
Final Check Before Installation
Reliable balcony and rooftop waterproofing begins before the first coat, sheet or membrane is installed.
Check that the substrate is sound and properly prepared, water can reach the intended drainage points, cracks and movement joints have suitable details, and penetrations and rooftop equipment are already coordinated.
Pay particular attention to thresholds, drains, parapets, corners and other transitions because these are places where waterproofing must connect with other building elements.
A membrane should be the waterproof layer within a properly planned system—not a cover for unresolved drainage, substrate or construction problems.
Getting those details right before installation can reduce the risk of leaks, avoid disruptive rework and give the waterproofing system a better chance of performing as intended.
FAQ’s
Balcony waterproofing can fail because of poor substrate preparation, inadequate drainage, untreated cracks or movement joints, badly detailed penetrations, incompatible materials or damage after installation. The cause should be identified rather than assuming the membrane itself is defective.
Check the substrate condition, moisture, cracks, joints, surface falls, drains, overflows, door thresholds, wall junctions, penetrations and membrane termination points. The selected waterproofing system should also be compatible with the substrate and intended use.
Waterproofing is not a substitute for proper drainage. The surface should have appropriate falls and correctly positioned drainage points so water can leave the area instead of collecting in low spots.
Cracks should be assessed before waterproofing. The appropriate treatment depends on the type of crack, substrate, expected movement and membrane system. Active or significant structural cracking may require professional assessment rather than simply filling or coating over it.
Leaks can develop around poorly detailed drains, penetrations, joints, edges, parapets and equipment supports. Poor surface preparation, ponding water, movement and damage caused by later construction work can also contribute to failure.
Drilling through a completed waterproofing membrane creates a new penetration and can compromise the continuous waterproof layer if it is not properly detailed and sealed. Where practical, penetrations and equipment locations should be established before waterproofing.
Preparation depends on the substrate and waterproofing product, but it commonly involves cleaning the surface, removing loose or incompatible material, repairing suitable defects, checking moisture and applying the specified primer. Always follow the membrane manufacturer’s technical requirements.
Drains, door thresholds, wall-to-floor junctions, parapets, corners, penetrations, movement joints, upstands and changes in level deserve particular attention because these locations require the membrane to connect or transition between different building elements.